Table of Contents maxLevel 2
Overview
This workflow enables CyVerse users to make submissions to the NCBI Sequence Read Archive (SRA). Submissions instructions include compressed sequenced files (FASTQ.gz, SFF.gz, and BAM.gz) and an XML metadata file, organized into a submission package. If you need to submit an alternative file format (HD5, SOLiD, and SRF) please submit a question to the CyVerse Ask forum shown below.
How to get help
- For help interpreting submission errors in SRA notification emails, email the SRA help desk at sra@ncbi.nlm.nih.gov.
For help with issues within the CyVerse Discovery Environment, or to provide feedback, visit the CyVerse Ask forum at http://ask.cyverse.org/questions/.
...
| Info |
|---|
Before You Start: Carefully read this tutorial. Before You Start: Review the example Input and output data and metadata for this tutorial in the Discovery Environment Data window in Community Data -> iplantcollaborative -> example_data -> SRA_submission. Before You Start: You must have an NCBI account to submit. You can obtain an NCBI account here. Before You Start: You must have used your NCBI account credentials to log into the SRA submitter system at least once to submit from CyVerse. To ensure that you have logged into the SRA submitter system: go to the the SRA homepage , click the tab at the top of the page labeled 'Submit', click the link 'NCBI PDA - NCBI Primary Data Submitters', authenticate if needed. Before You Start: Be aware that submission is not complete until you receive final notification from the SRA that your data have been received, processed, and will be released on the specified date. |
General Submission Steps and Important Information

Step 1 - Upload compressed sequence files into the CyVerse Discovery Environment (DE).
- For instructions on managing data / metadata and running analyses in the CyVerse Discovery Environment (DE), see the DE manual.
Step 2 - Create submission package folders and add compressed sequence files. The submission package is created using tools in the DE. Submission Packages have three levels: BioProject, BioSample, Library. Package organization is similar to the SRA organization detailed in the NCBI Quick Start Guide. Within the DE data and metadata for SRA-defined ‘Experiments’ and ‘Runs’ are part of the ‘Library level of the submission package’.
Each submission can either create a BioProject or add BioSamples to an existing BioProject.
Only one BioProject can be created or updated per submission.
Sequence files (FASTQ, SFF, or BAM) must be compressed before submission (e.g., FASTQ.gz, SFF.gz, or BAM.gz).
Library folders in the submission package must contain only compressed sequence files
Library folders may contain multiple compressed sequence files. One or more for multiple single-end sequencing libraries, and 2 files for paired-end libraries.
Step 3 - Add metadata to every folder in the submission package. BioProject, BioSample, and Library metadata are entered using metadata templates in the DE. After all metadata has been added, save a single metadata file from the BioProject-level folder.
Only submission package folders have metadata. Do not add metadata to the compressed sequence files.
Metadata entry is minimized using the ‘Metadata Copy’ function in the DE.
- Use the Metadata Term Guide in the DE for explanations of each metadata term. The guide is located within each template.
- 3 metadata templates will be used to add metadata to the submission package: BioProject, BioSample, and Library.
- For the BioProject Folder select one of these metadata templates: NCBI BioProject Creation, NCBI BioProject Update.
- For the BioSample Folder(s) select one of these metadata templates: NCBI BioSample - Beta-lactamase, NCBI BioSample - Human, NCBI BioSample - Invertebrate, NCBI BioSample - Metagenome of Environmental, NCBI BioSample - Microbe, NCBI BioSample - Model Organism / Animal, NCBI BioSample - Pathogen Clinical / Host-Associated, NCBI BioSample - Pathogen Env / Food / Other, NCBI BioSample - Plant, NCBI BioSample - Virus.
- For the Library Folder(s) use the metadata template: NCBI SRA Library.
- If you plan to submit a large number of BioSamples and/or Libraries, see the documentation for adding metadata templates in bulk.
- When entering a contact email on the BioProject metadata template, enter the email address associated with your NCBI account or you will not receive SRA email notifications on the status of your submission.
See http://www.ncbi.nlm.nih.gov/biosample/docs/packages/ for help determining the appropriate BioSample type for your data.
- If you require BioSample Templates for variants of MIMS, MIGS, or MIMARKS data, please make the request at http://ask.cyverse.org/questions/.
Any change to folder names, file names, or metadata requires that you save a new metadata file before submission.
Step 4 - In a 2-stage process, select the appropriate SRA Submission App to first validate the submission package and then, after successful validation, to submit to the SRA. For validation, the App will attempt to create a submission.xml metadata file for use by the SRA system based on the metadata entered into the templates, but will not transfer any files to the SRA. For submission, the App will both create the submission.xml metadata file and transfer it and all compressed sequence files to the SRA.
- The App chosen must match the BioProject metadata template for BioProject Creation or BioProject Update.
- The same App will be run twice, once for validation, and once for submission.
- If you made any changes to the submission package contents or file/folder names or metadata since last saving the BioProject metadata file remember to resave the BioProject metadata file before running an App.
- The information buttons in the App
(to the left of the app name in the Apps list) provide important details.
- The Validation stage is optional but may highly reduce errors detected by the SRA. This is suggested for first time users.
For either validation or submission, if the App fails and no submission.xml file is created, there are one or more errors in the submission package. See the Analysis log files (especially condor-stderr-0) for information to assist with error correction. After you correct each error, be sure to recreate the metadata file and revalidate it. The analysis will fail with the first error it encounters, so this step may need to be run multiple times.Anchor validation_fails validation_fails - Successful validation within the DE does not guarantee that the SRA will not detect additional errors.
- No analyses are performed by the App. Metadata will be aggregated into the submission.xml file (Validation and Submission stages) and the package will be transferred to the SRA (Submission Stage).
Step 5 - The submission package will be validated by the SRA system and email notifications will be sent by the SRA to the contact email added in the BioProject metadata to confirm successful submission, or to communicate submission errors.
- SRA processing may take 72 hours (or longer) depending on the load on their systems.
Step 6 - If error correction and resubmission are needed, the SRA-generated error report can be retrieved with the ' NCBI SRA Submission Report Retrieval' App. Corrections to the submission package can be made within the DE, and resubmission follows the same process.
- During error correction, only make changes to SRA-detected errors. All other changes will be ignored by the SRA during resubmission. If additional changes are required, they can be made using the NCBI website after successful submission.
...
- Input: Sequence files to be submitted to the SRA, preferably compressed before upload.
- Output: Compressed sequence files to be submitted are within the CyVerse Discovery Environment.
- Caveats and Suggestions for Compressing Files Before Upload
Sequence files must be compressed before submission (e.g., FASTQ.gz, SFF.gz, or BAM.gz).
One popular method for Mac or Linux is the gzip command (executed from the UNIX command line). The command ‘gzip -k <file_name>’ will produce a compressed file, leaving the original file in place. Omitting the ‘-k’ will remove the original file during compression. To decompress a file from the command line use ‘gzip -d <file_name.gz>’.
One popular method from a Windows machine is the 7-Zip software.
Figure 1 (click to expand) - gzip Example

Caveats and suggestions for uploading files
Compressed sequence files must be compressed before submission (e.g., FASTQ.gz, SFF.gz, or BAM.gz).
Upload of uncompressed files to the DE may take significantly more time depending on file sizes and the number of files. If possible, compress files before upload using your favorite compression program.
See this guide to choose the most appropriate upload method.
CyVerse Upload Tutorial - CyberDuck is highly recommended for your uploads!
Caveats and Suggestions for Compressing Files After Upload
Compressed sequence files must be compressed before submission (e.g., FASTQ.gz, SFF.gz, or BAM.gz).
If you are not able to compress files before transfer, or your uncompressed data are already in the DE, use the ‘Compress files with gzip’ App in the DE ( Apps window tutorial ). If you have multiple files to compress, you can create an HT analysis file and submit them simultaneously.
Figure 2 (click to expand) - DE Compression App. Left Pane shows a Data window used to create an HT Analysis Path List file to submit a list of files to an App. Right Pane shows the ‘Compress files with gzip’ App with an HT Analysis Path List file as input. This App will also accept single files as input.

Step 2) Create and organize submission package
Create submission package folders and add compressed sequence files. The submission package is created using tools in the DE. Submission Packages have three levels: BioProject, BioSample, Library. Package organization is similar to the SRA organization detailed in the NCBI Quick Start Guide. Within the DE, data and metadata for SRA-defined ‘Experiments’ and ‘Runs’ are part of the ‘Library level of the submission package’.
| Info |
|---|
An example of a submission package is in the Discovery Environment Data window under Community Data -> iplantcollaborative -> example_data -> SRA_submission -> 0_Submission_Input -> BioProject_Create_Example. |
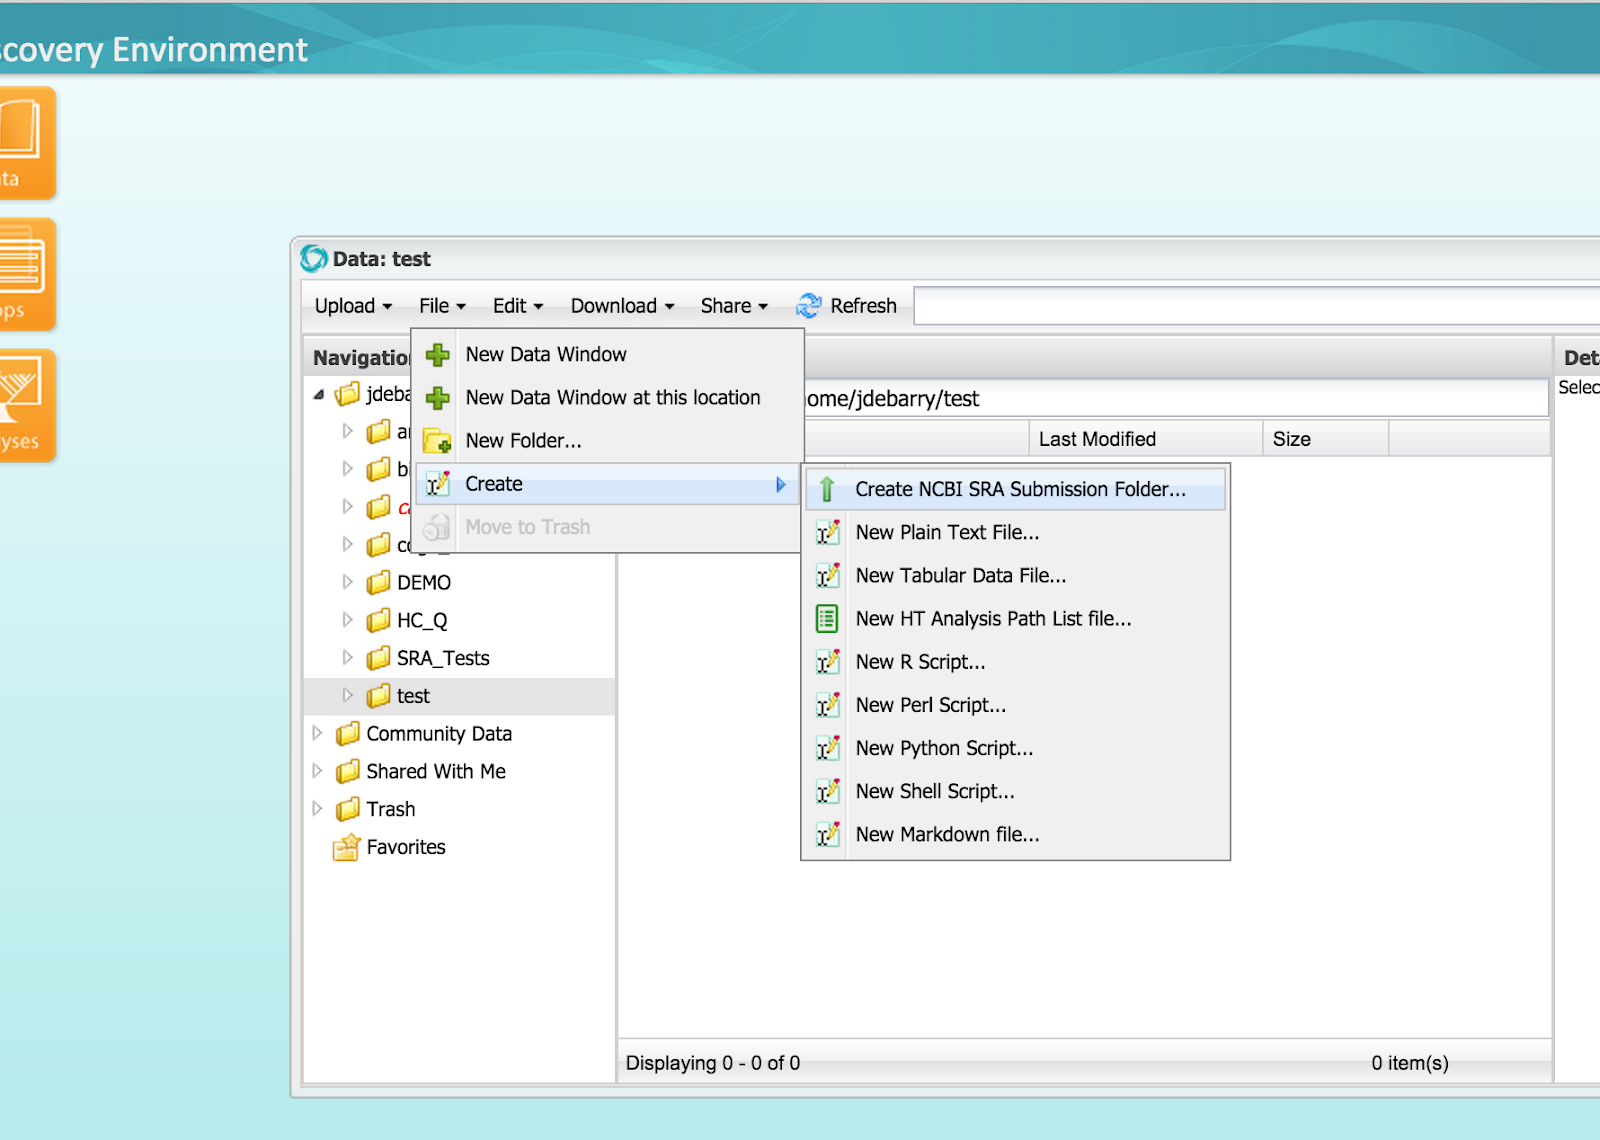
An SRA submission package contains a BioProject folder with 1 or more BioSample folders, each of which contain 1 or more Library folders. Each Library folder contains 1 or more compressed sequence files. Use the Discovery Environment (DE) ‘Create NCBI SRA Submission Folder’ tool to create the submission package, then add your compressed files to the ‘Library’ folders.
Input: Compressed sequence files
Output: Submission package
- Caveats and Suggestions
- Each submission can either create a BioProject or add BioSamples to an existing BioProject.
- Only one BioProject can be created or updated per submission.
- Compressed sequence files must be compressed before submission (e.g., FASTQ.gz, SFF.gz, or BAM.gz).
- Library folders in the submission package must contain only compressed sequence files
- Library folders may contain multiple compressed sequence files. One or more for multiple single-end sequencing libraries, and 2 files for paired-end libraries.
- It will be easier to distribute sequence files into Library folders by opening separate data windows and dragging sequence files into folders. Use Control+Shift+D to open a new data window.
...
Figure 3 (click to expand) - Create Submission Package
Step 2B) Enter information on the number of BioSamples and Libraries
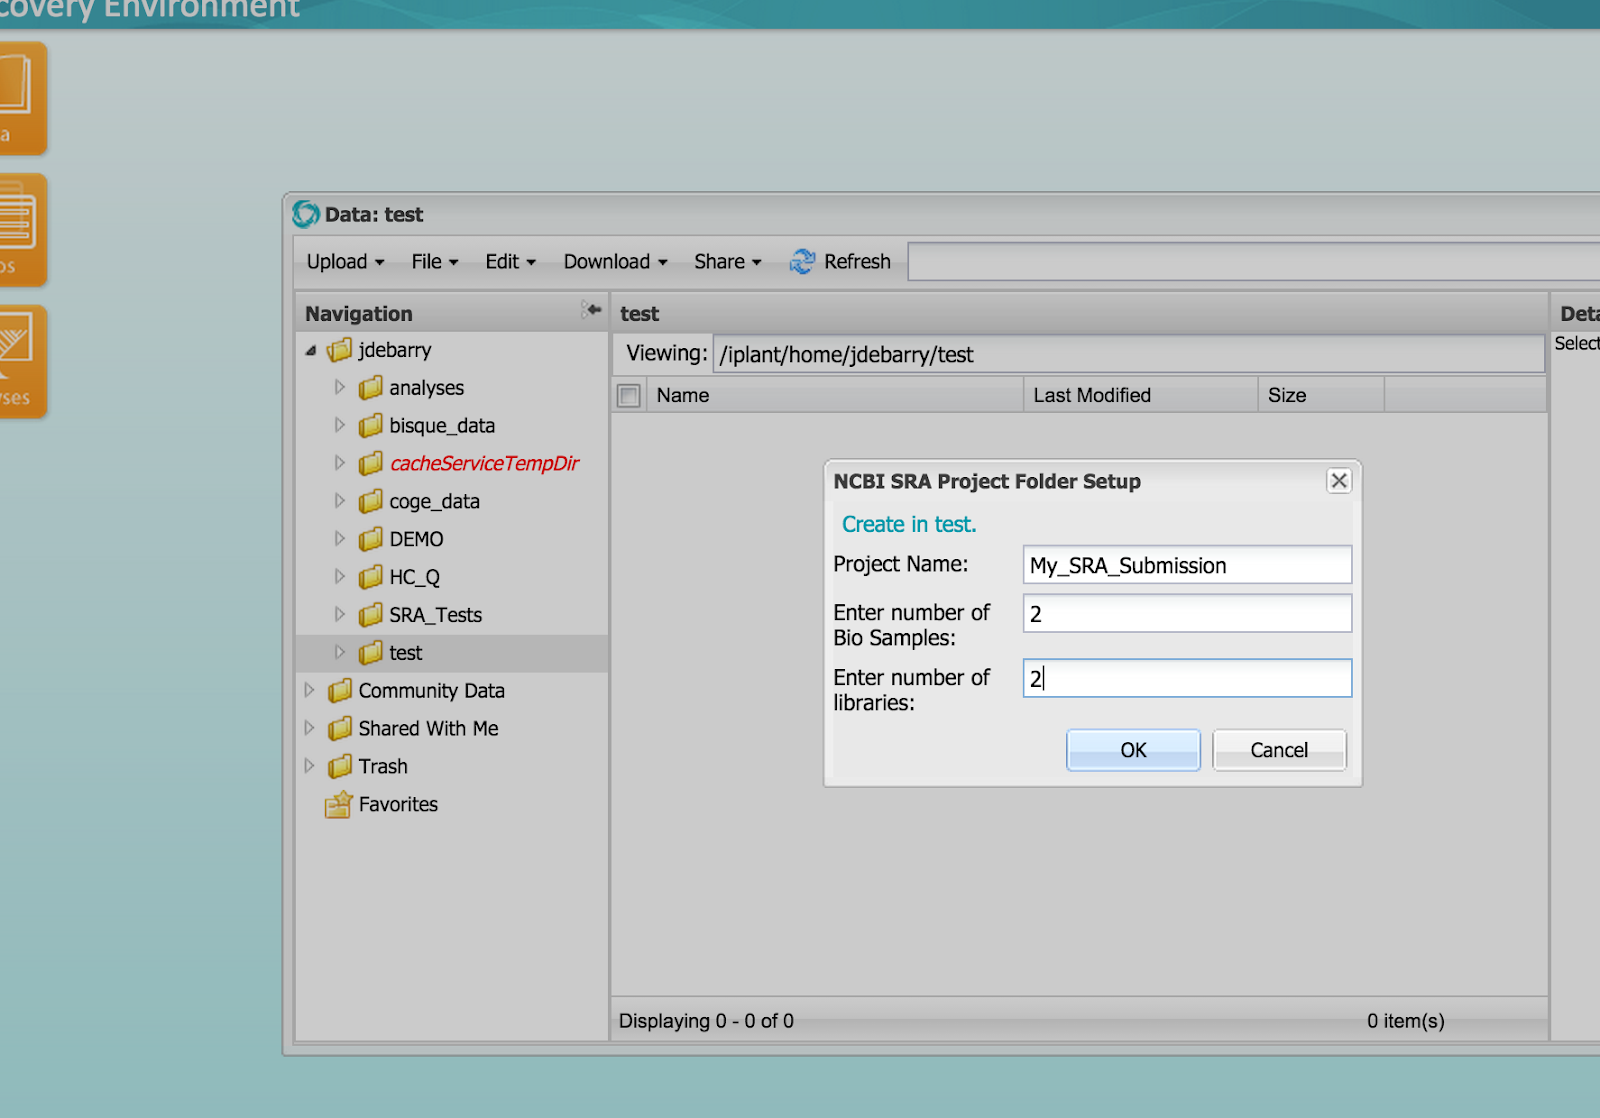
Name the top-level BioProject Folder (follow link for more information on NCBI BioProjects).
Enter total number of BioSamples in your submission (follow link for more information on NCBI BioSamples).
Enter the largest number of sample-specific sequencing libraries among your BioSamples. For example, if you have two BioSamples and one of them has one library and the other has two, enter ‘2’ for the number of libraries. If you have more Libraries for some BioSamples than others, this will generate some empty Library folders in the next step. You can remove these empty Library folders, or ignore them.
Figure 4 (click to expand) - Entering Submission Package Information
Step 2C) Distribute compressed sample-specific sequence files into the Library folders. Each Library folder will have one or two compressed sequence files for single or paired data respectively.

Step 3) Enter metadata at each level of the submission package and save a BioProject metadata file
Add metadata to every folder in the submission package. BioProject, BioSample, and Library metadata are entered using metadata templates in the DE. After all metadata has been added, save a single metadata file from the BioProject-level folder.
| Info |
|---|
An example of submission package metadata is in the Discovery Environment Data window under Community Data -> iplantcollaborative -> example_data -> SRA_submission -> 0_Submission_Input -> BioProject_Create_Example, where you can view the metadata for each folder. |
Enter metadata via pulldown templates for each folder level (BioProject, BioSample, Library)
Input: Submission package created in the last step.
Output: Submission package with metadata for every populated folder and a BioProject metadata file saved from the top-level BioProject folder in the submission package.
Caveats and Suggestions
3 metadata templates will be used to add metadata to the submission package: BioProject, BioSample, and Library:
- For the BioProject Folder select one of these metadata templates: NCBI BioProject Creation, NCBI BioProject Update
- For the BioSample Folder(s) select one of these metadata templates: NCBI BioSample - Beta-lactamase, NCBI BioSample - Human, NCBI BioSample - Invertebrate, NCBI BioSample - Metagenome of Environmental, NCBI BioSample - Microbe, NCBI BioSample - Model Organism / Animal, NCBI BioSample - Pathogen Clinical / Host-Associated, NCBI BioSample - Pathogen Env / Food / Other, NCBI BioSample - Plant, NCBI BioSample - Virus.
- For the Library Folder(s), use the NCBI SRA Library metadata template.
- Use the Metadata Term Guide in the DE for explanations of each metadata term. The guide is located within each template.
- If you plan to submit a large number of BioSamples and/or Libraries, see the documentation for adding metadata templates in bulk.
- When entering a contact email on the BioProject metadata template, enter the email address associated with your NCBI account or you will not receive SRA email notifications on the status of your submission.
- To update a BioProject, you will need the existing NCBI BioProject Accession number.
At the BioSample and Library submission package levels, enter metadata that applies to multiple folders first, then copy it to all folders at that level. Metadata will be copied from the folder selected when the ‘Copy Metadata’ function is chosen. For more information, see the CyVerse wiki page for metadata copying. If one of the required metadata fields is not shared, you can enter a placeholder so that you can save the template contents for copying, and then edit that field for each folder. After copying, use the ‘Edit metadata’ function to add additional metadata to each folder.
- See http://www.ncbi.nlm.nih.gov/biosample/docs/packages/ for help determining the appropriate BioSample type for your data.
If you require BioSample Templates for variants of MIMS, MIGS, or MIMARKS data, please make the request at http://ask.cyverse.org/questions/.
- If you need to remove a metadata template, use the blue “Remove Template” button at the top of the template. This will remove all metadata from that template.
Only submission package folders have metadata. Do not add metadata to the compressed sequence files.
Any change to folder names, file names, or metadata requires that you save a new metadata file before submission.
Step 3A) For the top-level, or BioProject, folder in the submission package, select one of these metadata templates: NCBI BioProject Creation of NCBI BioProject Update, and enter metadata (metadata template tutorial).
Figure 6 (click to expand) - Open Metadata Templates: From the menu, select Edit -> Edit Metadata.
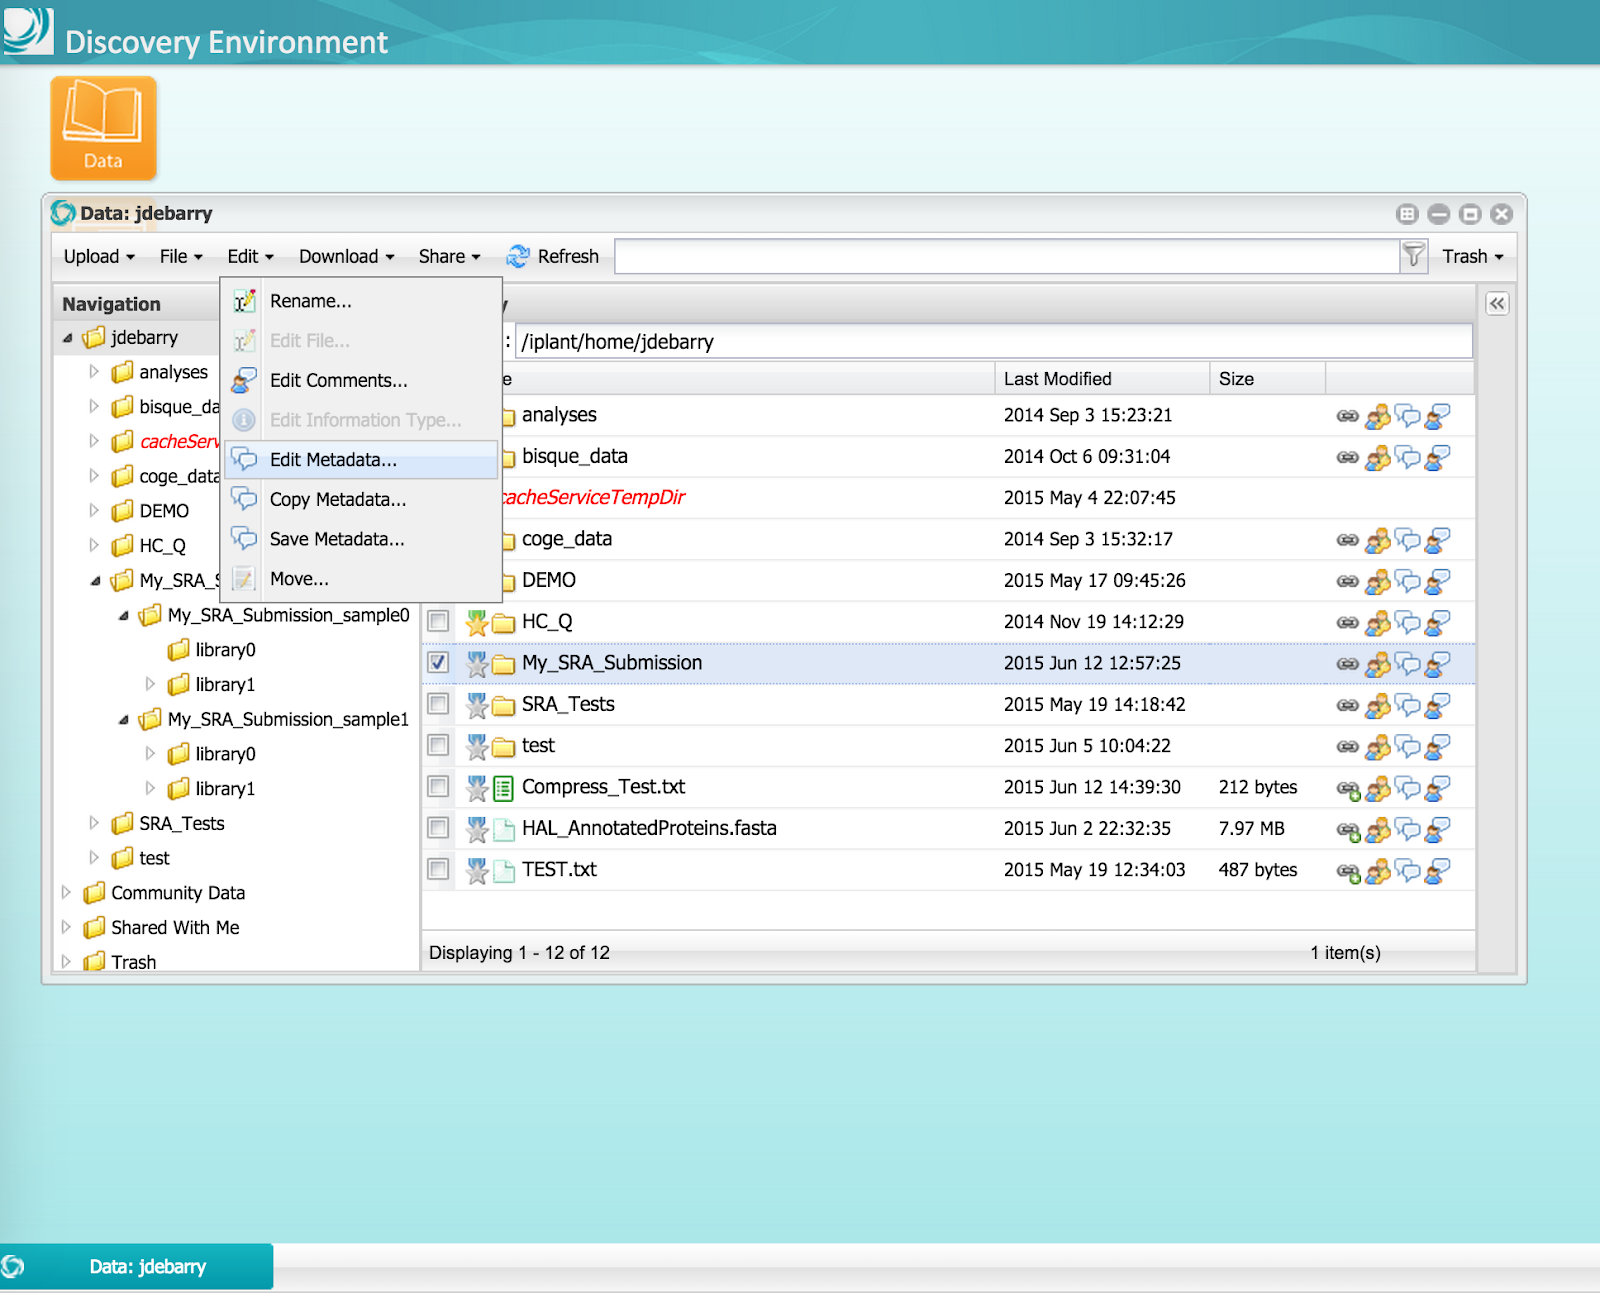
Figure 7 (click to expand) - Select Appropriate BioProject Metadata Template: NCBI BioProject Creation or NCBI BioProject Update.

Step 3B) For each BioSample folder in the submission package, select one of these metadata templates: NCBI BioSample - Beta-lactamase, NCBI BioSample - Human, NCBI BioSample - Invertebrate, NCBI BioSample - Metagenome of Environmental, NCBI BioSample - Microbe, NCBI BioSample - Model Organism / Animal, NCBI BioSample - Pathogen Clinical / Host-Associated, NCBI BioSample - Pathogen Env / Food / Other, NCBI BioSample - Plant, NCBI BioSample - Virus.
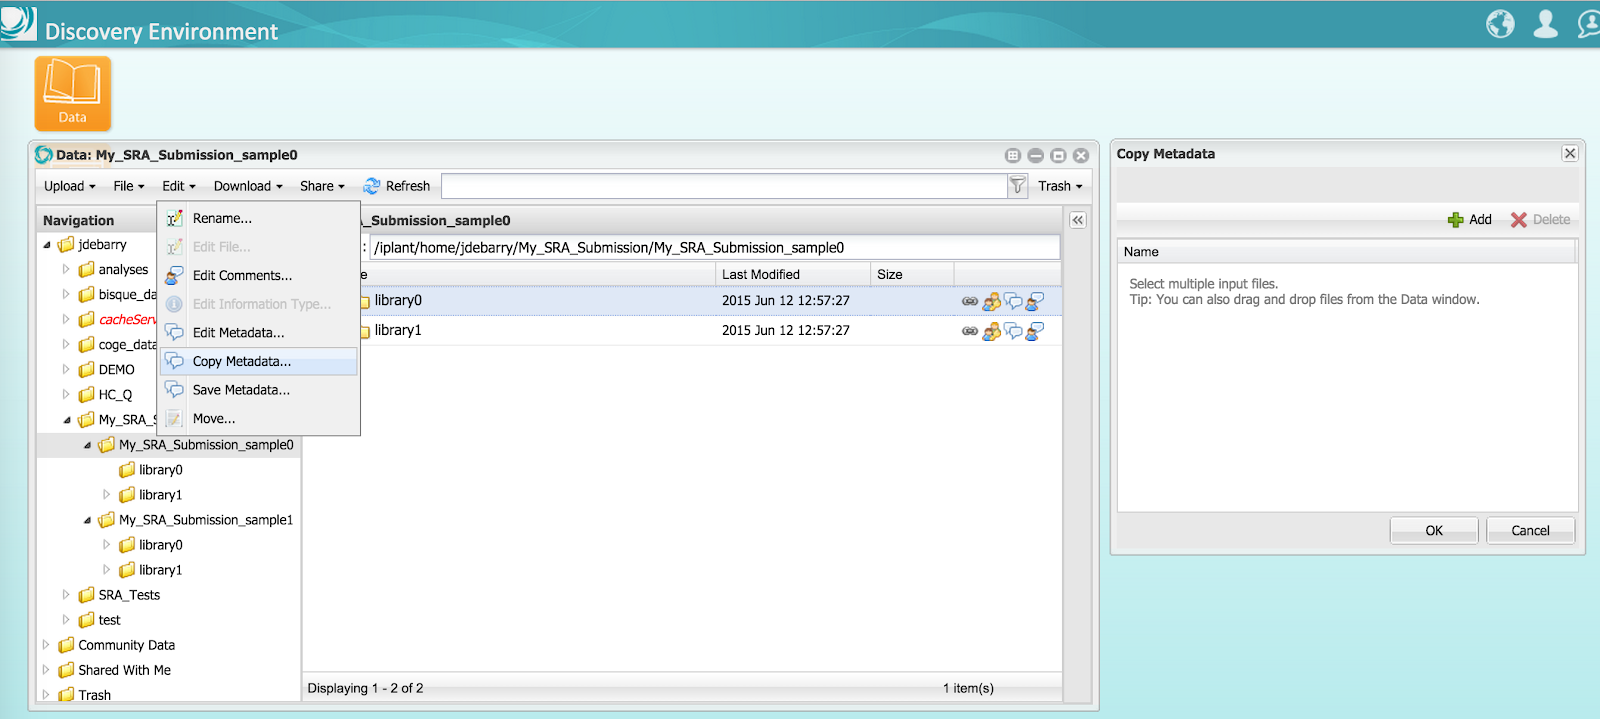
To facilitate metadata entry, enter all shared metadata for a single BioSample folder and then copy it to all other BioSample folders. After copying, you can add unique metadata to each BioSample folder.
Figure 8 (click to expand) - Metadata Copying
Step 3C) For each Library folder in the submission package, select the ‘NCBI SRA Library’ template and enter metadata. To facilitate metadata entry, enter all shared metadata for a single Library folder and then copy it to all other Library folders. After copying, you can add unique metadata to each Library folder. Do not add metadata to the compressed sequence files.
Step 3D) After all metadata have been entered, select the the top-level BioProject folder in the submission package and use the ‘Save metadata’ function to save a BioProject metadata file for the submission package. This file will serve as input into the SRA submission App in the next step.

Step 4) Submit package to the SRA
...
Step 4a - Validation - Select either the ‘ NCBI SRA Submission - BioProject Creation ’ or ‘ NCBI SRA Submission - BioProject Update ’ app. Run the app with the 'Validate metadata file only' option (Tutorial for running Apps in the DE). If the submission.xml file is created in the DE Analysis output folder, the package has successfully passed validation – move on to submission. If validation fails check the log files to find out why.
- Input: The BioProject folder (top level of the submission package) and the BioProject metadata file (saved from the top-level of the submission package).
Output:
Logs folder with information on job execution.
Folder named with your CyVerse username and the top-level BioProject folder ID that contains the submission.xml (metadata file formatted for ingestion by the SRA).
Step 4b Submission - After successful validation, run the same app used in the Validation stage, without selecting the 'Validate metadata file only' option to submit.
Input: The BioProject folder (top-level of the submission package) and the BioProject metadata file (saved from the top-level of the submission package)
Output:
Logs folder with information on job execution that includes a ‘.manifest.txt’. file with a log of the files transferred to the SRA.
Folder named with your CyVerse username and the top-level BioProject folder ID that contains the submission.xml (metadata file formatted for ingestion by the SRA) and a submit.ready file used to signal SRA systems that submission is complete and to process the submission package.
Caveats and Suggestions
- The app you choose must match the BioProject metadata template for BioProject Creation or BioProject Update.
- The same app will be run twice: once for validation and once for submission.
- If you made any changes to the submission package contents or file/folder names or metadata since last saving the BioProject metadata file, remember to resave the BioProject metadata file before running an App.
- The information buttons in the Apps
- The Validation stage is optional but may highly reduce errors detected by the SRA. This is suggested for first time users.
- For either validation or submission, if the app fails and no submission.xml file is created, there are one or more errors in the submission package. See the Analysis log files (especially condor-stderr-0) for information to assist with error correction.
- Successful validation within the DE does not guarantee that the SRA will not detect additional errors.
- No actual analyses are performed. Metadata will be aggregated into the submission.xml file (Validation and Submission stages) and the package will be transferred to the SRA (Submission Stage).
Step 5) Receive submission notification from SRA (to email you provided as contact email address using BioProject metadata template)
The submission package will be validated by the SRA system and email notifications will be sent by the SRA to the contact email added in the BioProject metadata to confirm successful submission, or to communicate submission errors.
What happens at SRA? CyVerse systems connect to SRA systems and create the submission folder on the SRA side. Files are transferred and a submit.ready file is sent to the SRA to signal that the submission package is complete and they can begin processing. The SRA system validates the submission package and generates a report.xml file containing any errors detected. The SRA system sends notification email(s) to the contact email provided in the BioProject metadata template, and to the CyVerse team to notify of either a successful or failed submission. The first email will be titled "Submission ownership transfer". Follow the instructions in that email to transfer ownership of the submission to the NCBI user included in the package metadata. After ownership transfer, you can view the submission progress at https://submit.ncbi.nlm.nih.gov/subs/. You may need to log in with the NCBI credentials for the account you used in the submission metadata. After you receive further notification from the SRA, if there are errors, you can retrieve the submission report.xml file from SRA servers with the 'NCBI SRA Submission Report Retrieval' App in the DE, make corrections, and resubmit (see below).
...
Step 6) If the SRA detects submission errors, retrieve SRA-generated submission report, correct, and resubmit
If error correction and resubmission are needed, the SRA-generated error report can be retrieved with the ' NCBI SRA Submission Report Retrieval' App. Use this report to correct the errors and resubmit. Corrections to the submission package can be made within the DE by updating the submission package organization or metadata, and resubmitting beginning with Step 4.
| Info |
|---|
An example of a retrieved submission report is in the Discovery Environment Data window under Community Data -> iplantcollaborative -> example_data -> SRA_submission -> 2_SRA_Report_Retrieval_Output -> BioProject_Create_Example. |
...
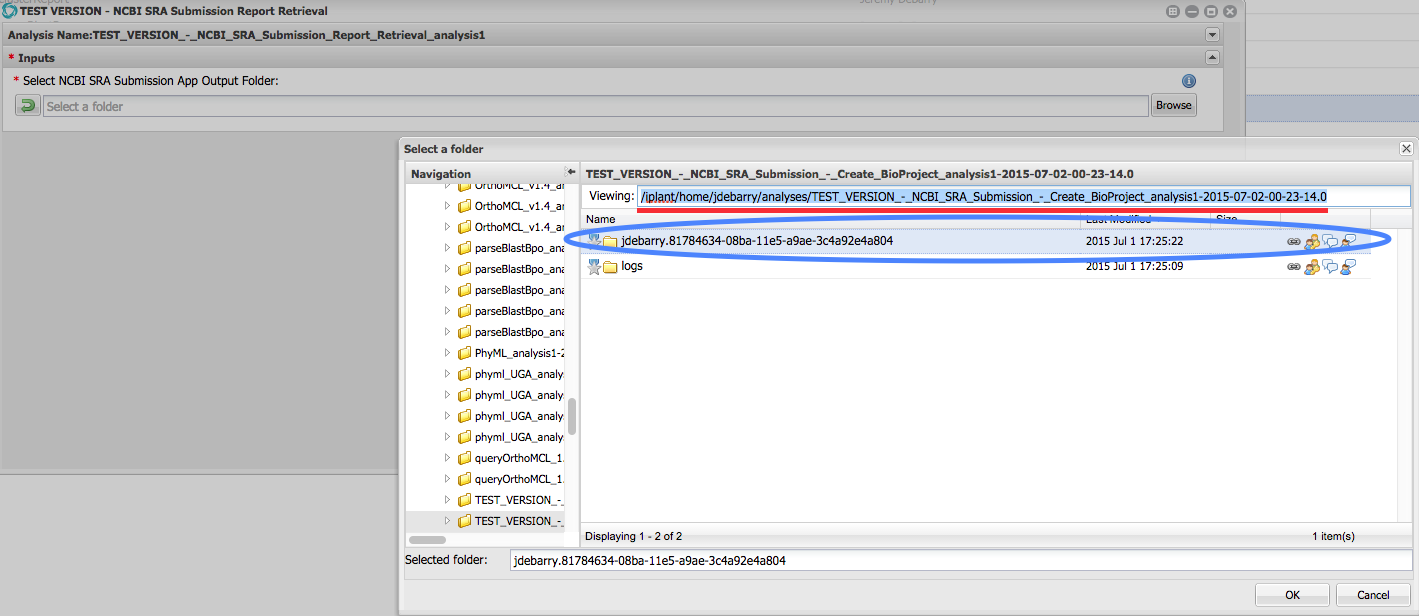
To retrieve the submission report, select the “NCBI SRA Submission Report Retrieval” App, and as input, select the CyVerse Analysis output folder generated during the last submission.It will be named with your CyVerse username. The report will be fetched from the SRA and placed in a new Analysis output folder generated by the retrieval App. To resubmit, make necessary changes to the submission package data and metadata, resave a BioProject metadata file from the top-level folder of the submission package, and resubmit with the appropriate SRA submission App (Create or Update).
Figure 10 (click to expand) - Selecting SRA Submission Analysis Output Folder as Input for the SRA Submission Report Retrieval App Input: Navigate to the correct Analysis output folder for the report you want to retrieve. See path underlined in red for an example. Select the folder that begins with your CyVerse username. See folder circled in blue for an example.