NCBI Whole Genome Shotgun (WGS) Submission Tutorial
Overview
Genome submissions are comprised of genomic DNA sequences representing either incomplete or complete genomes from both prokaryotes and eukaryotes. Incomplete genomes (or incomplete chromosomes of prokaryotes or eukaryotes) are those submissions that have been derived from data created by whole-genome shotgun (WGS) sequencing methods or traditional clone-based sequencing, respectively. WGS projects may be annotated, but annotation is not required. Complete genomes are those genomes or prokaryotes or eukaryotes that have chromosomes in single sequence without gaps or N's that represent gaps
This workflow enables CyVerse users to make incomplete genomes submissions to the NCBI Whole Genome Shotgun (WGS) only. If you are submitting complete genome submissions to the NCBI (prokaryotic or complete eukaryotic genomes or chromosomes) see the table below for more information.
| Complete prokaryotic genomes | GenBank Prokaryotic Genomes: Records retrievable from the Nucleotide Database GenBank archives complete prokaryotic genomes with user submitter-supplied annotations. Alternatively, submitters now can request automated NCBI annotation of sequences as part of the submission process. NCBI has a Prokaryotic Genomes Annotation Pipeline that may be requested when genome files are submitted to GenBank. This pipeline generates a submission-ready annotated file that the submitter could edit prior to data release. For more information, read about the Prokaryotic Genomes Annotation Pipeline. | Start Here |
| Complete eukaryotic genomes or chromosomes | GenBank Eukaryotic Genomes and Chromosomes: Records retrievable from the Nucleotide Database GenBank accepts the submission of complete eukaryotic chromosomes or complete genomes with submitter-supplied annotations. Complete genomes, with each of the chromosomes in single sequences, should be submitted to GenBank as a complete genome. The most common complete genomes are bacteria, archaea, and fungi. Complete genomes are defined for GenBank as the chromosomes, although any plasmids that are isolated with the chromosomes should be submitted too. As of July 2013, these sequences are allowed to contain gaps and are not required to include annotation. However, submitters need to know what kinds of gaps and linkage evidence are present, as described in Gapped Format for Genome Submissions. For information about annotating genomes, see the prokaryotic annotation guide or eukaryotic annotation guide. | Start Here |
If you are unsure about the type of data submitted to the WGS division, visit the WGS List for example projects.
Types of WGS submissions
This workflow is only meant for WGS submissions. The differences in GenBank purposes are:

Non-WGS
- Each chromosome is in a single sequence and there are no extra sequences.
- Each sequence in the genome must be assigned to a chromosome or plasmid.
WGS
- One or more chromosomes are in multiple pieces and/or some sequences are not assembled into chromosomes.
For both Non-WGS and WGS
- There still can be gaps within the sequences; you will supply the information about the gaps during submission.
- Plasmids and organelles can still be in multiple pieces.
- Internal sequences must be arranged in the correct order and orientation.
- Sequences must be concatenated in the correct order
Standard Submission Scenarios
There are two main formats for WGS submissions:
- Split format (standard WGS submission format):
- The pieces of a WGS project are the contigs (overlapping reads with no gaps).
- The WGS project cannot have consequence "n"s to represent sequencing gaps.
- An optional AGP file (which provide the ordering and orientation information to construct scaffolds from contigs, or to construct chromosomes from scaffolds/contigs) can be submitted to indicate how the WGS sequences are assembled together into scaffolds or chromosomes.
Annotated
.sqn, Optional AGP, .qvl and .tbl files
Unannotated
fsa, Optional AGP
- Gapped format:
- The pieces of a WGS project are the scaffolds that contain runs of Ns that represent gaps.
- The WGS entries can contain consequence "n"'s to represent sequencing gaps.
- An AGP file is not required for the gapped format. See Gapped Genome Submission for details. Sequences that are simply concatenated and joined by Ns are not allowed.
- Gapped Format (scaffolds or chromosomes with Ns between gaps)
- Annotated
- .sqn, Optional .qvl and .tbl files
- Unannotated
- .sqn, Optional .qvl file
- Annotated
Prerequisites
- Carefully read this tutorial.
- Review the example Input data, Output data, and metadata for this tutorial in the Discovery Environment Data window in Community Data -> iplantcollaborative -> example_data -> WGS_submission.
- You must have an NCBI account to submit. You can obtain an NCBI account here.
- You must have used your NCBI account credentials to log into the WGS submitter system at least once to submit from CyVerse. To ensure that you have logged in to the WGS submitter system, go to the WGS homepage.
- Be aware that submission is not complete until you receive final notification from the WGS that your data have been received, processed, and will be released on the specified date.
For help interpreting submission errors in WGS notification emails, email the WGS help desk at genomes@ncbi.nlm.nih.gov.
For help with issues within the CyVerse Discovery Environment, or to provide feedback, email support@cyverse.org.
Basic workflow

WGS submission steps (for advanced users)
An example of submission package metadata is in the Discovery Environment Data window under Community Data -> iplantcollaborative -> example_data -> WGS_submission
Step 1: Create an NCBI WGS submission folder in the DE
The submission package is created using tools in the DE. The submission package has three levels: BioProject, BioSample, and Library. Package organization is similar to the SRA organization detailed in the NCBI Quick Start Guide.
Each submission will create a BioProject, BioSample(s) and a Library folder(s).
Only one BioProject can be created per submission.
- The BioProject and BioSample will have to be registered during the WGS submission process for now.
Step 2: Add metadata to every folder in the submission package, save the metadata to a file, and validate the metadata file
BioProject, BioSample, and Library metadata are entered using metadata templates in the DE.
Only submission package folders have metadata. Do not add metadata to the sequence files
Use the Metadata Term Guide in the DE for explanations of each metadata term. The guide is located within each template.
- Three metadata templates will be used to add metadata to the submission package: BioProject, BioSample, and Library.
- For the BioProject Folder, select the NCBI BioProject Creation WGS metadata template.
- For the BioSample Folder(s), select the NCBI BioSample - Plant WGS metadata template.
- For the Library Folder(s), select the NCBI WGS Library metadata template.
- If you plan to add metadata to a large number of BioSamples and/or Libraries, see the documentation for adding metadata templates in bulk.
- When entering a contact email on the BioProject metadata template, you must enter the email address associated with your NCBI account in order to receive WGS email notifications on the status of your submission.
See http://www.ncbi.nlm.nih.gov/biosample/docs/packages/ for help determining the appropriate BioSample type for your data.
- Use the NCBI_WGS_Submit DE app to validate the metadata file. For validation, the app will attempt to create a submission.xml metadata file for use by the WGS system, based on the metadata entered into the templates.
Step 3: Create the submission template
Use the saved metadata file in Step 2 to create the submission template (.sbt) using the meta2tbl app in the DE.
Step 4: Convert fasta to sqn file format
Run tbl2asn-gapped-25.3 or tbl2asn-ungapped-25.3 along with the submission template generated in Step 3 for converting fasta files to sqn format, depending on the type of your WGS submission. Check the output of the Validation and Discrepancy Report, and fix any problems,
- If the sequence has gaps, use an estimated number of NNN denoting gaps or, if the gap is of unknown size, use 100 NNNs in the gap region.
- Check the errorsummary.val file for the number, severity, and type of errors that are present in the .val files. All errors and rejects need to be fixed. Contact genomes@ncbi.nlm.nih.gov with any questions about the validation output.
- Check the file named discrep for the results of the discrepancy report. Categories prefaced with FATAL are always unacceptable and must be fixed. Some of the categories are informational. Reports that are not flagged as fatal need to be evaluated to determine if they represent annotation artifacts that need to be corrected or if they are acceptable due to the biology of the genome. See the discrepancy report examples and explanations for guidance. Write to genomes@ncbi.nlm.nih.gov and send the discrep file with questions about this report.
- Make any necessary fixes to the input .fsa and/or .tbl files, and run tbl2asn again. You also can make the necessary fixes directly to the .sqn file by opening it in Sequin and editing the features there.
Step 5: Move the sqn files (sqn) into the library subfolder
The sqn file generated in Step 4 needs to be moved into the libraries folder under Bioproject -> Biosample, and save the Bioproject metadata to a file.
Step 6: Submit to WGS
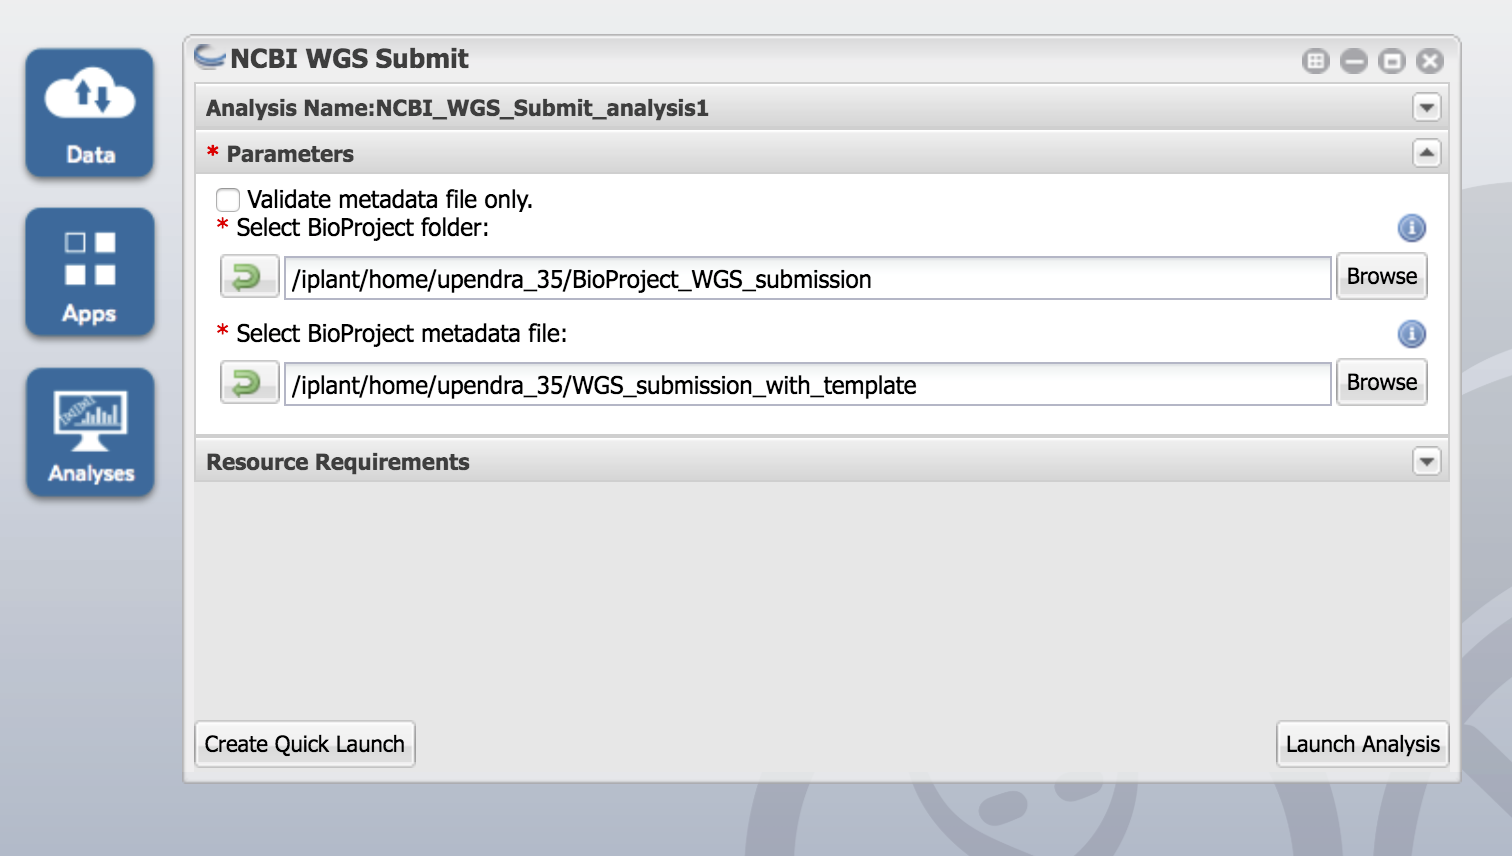
Run the NCBI_WGS_Submit app to submit to the WGS.
Make sure you uncheck the Validate metadata file only checkbox.
The app will both create the submission.xml metadata file and transfer all sequence files to the WGS.
Step 7: Download the report
Detailed WGS submission Steps (for beginners)
An example of submission package metadata is in the Discovery Environment Data window under Community Data -> iplantcollaborative -> example_data -> WGS_submission.
Step 1: Create and organize the submission package
The submission package is created using tools in the DE. Submission packages have three levels: BioProject, BioSample, and Library. Package organization is similar to the SRA organization detailed in the NCBI Quick Start Guide.
Until the next DE release, the submission package is the same for both SRA and WGS.
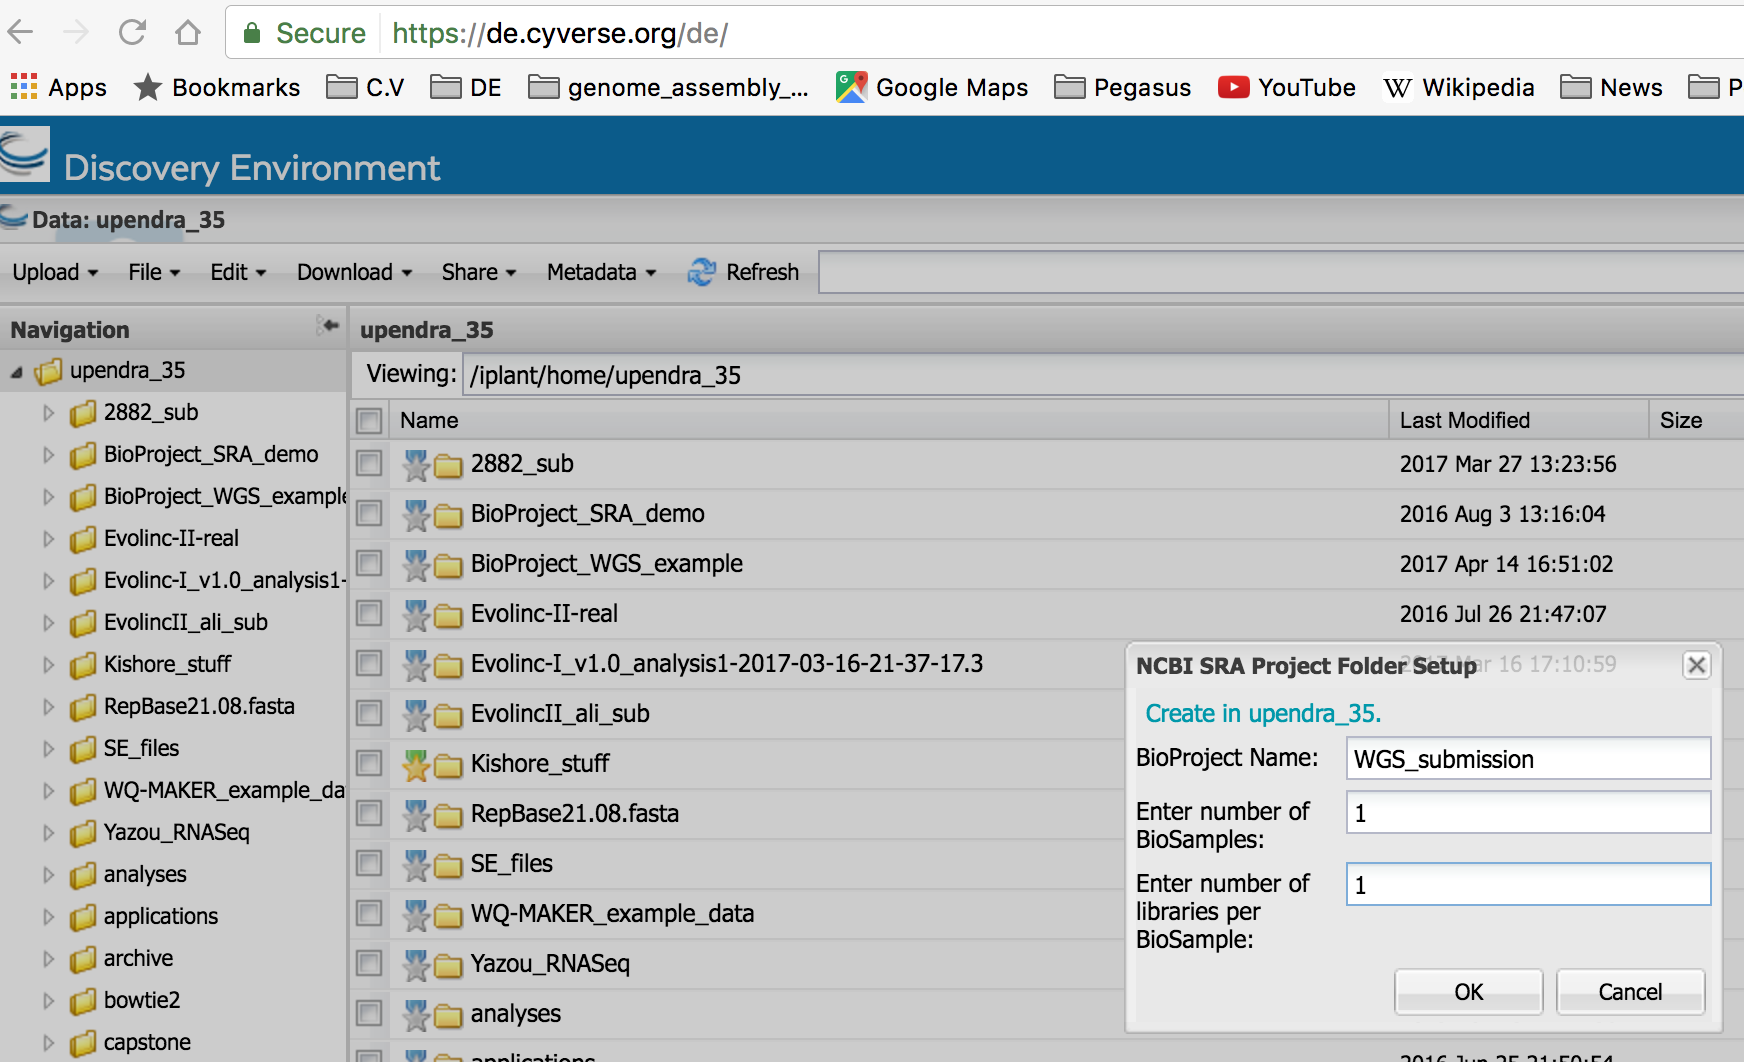
A WGS submission package contains a BioProject folder with one or more BioSample folders, each of which contains one or more Library folders, and each Library folder contains one or more sequence files. Use the Discovery Environment (DE) Create NCBI SRA Submission Folder tool to create the submission package (see figure below)
- BioProject, to cluster the data from the same research project. Each genome must belong to a BioProject. Genomes sequenced as part of the same research effort can belong to a single BioProject, either ‘multiisolate’ or ‘multispecies’.
- BioSample, to provide detailed information about the sample that was sequenced. Biosample info and Biosample packages.
- Library, to provide details of the WGS library.
Caveats and suggestions
- Each submission now can create a BioProject and BioSamples, but cannot update an existing BioProject or BioSample.
- Only one BioProject can be created per submission.
- From the DE Data window, create a submission folder at File -> Create -> Create NCBI SRA Submission Folder.
Enter information on the number of BioSamples and Libraries.
Name the top-level BioProject folder (click the link for more information on NCBI BioProjects).
Assign each genome to a BioProject. Genomes sequenced as part of the same research effort can belong to a single BioProject.
Enter the total number of BioSamples in your submission (click the link for more information on NCBI BioSamples).
If the same sample is used for two different genome assemblies, use the same BioSample for both.
Enter the largest number of sample-specific sequencing libraries among your BioSamples. For example, if you have two BioSamples and one of them has one library and the other has two, enter ‘2’ for the number of libraries. If you have more Libraries for some BioSamples than others, this will generate some empty Library folders in the next step.You can remove these empty Library folders, or ignore them.
- Raw reads should be submitted to the SRA:

Step 2: Enter metadata at each level of the submission package, save a BioProject metadata file, and validate the metadata file
- Add metadata to every folder in the submission package. BioProject, BioSample, and Library metadata are entered using metadata templates in the DE. After all metadata has been added, save a single metadata file from the BioProject-level folder.
- Enter metadata via the pulldown templates for each folder level (BioProject, BioSample, Library):
- Input: Submission package created in Step 1.
Output: Metadata file saved from the top-level BioProject folder in the submission package.
Three metadata templates will be used to add metadata to the submission package: BioProject, BioSample, and Library, successively:
- For the BioProject folder select "NCBI BioProject Creation WGS" metadata template and fill all the fields.
- For the BioSample folder(s) select "NCBI BioSample - Plant WGS" metadata template and fill all the fields.
- For the Library folder(s) select "NCBI WGS Library" metadata template and fill all the fields.
- When entering a contact email on the BioProject metadata template, enter the email address associated with your NCBI account or you will not receive WGS email notifications on the status of your submission.
- Use the Metadata Term Guide in the DE (located within each template) for explanations of each metadata term.
- To remove a metadata template, click the blue Remove Template button at the top of the template. This removes all metadata from that template.
- If you plan to submit a large number of BioSamples and/or Libraries, see the documentation for adding metadata templates in bulk.
- Alternatively, at the BioSample and Library submission package levels, enter metadata that applies to multiple folders first, then copy it to all folders at that level. Metadata will be copied from the folder selected when the Copy Metadata function is chosen. For more information, see the CyVerse wiki page for metadata copying. If one of the required metadata fields is not shared, you can enter a placeholder so that you can save the template contents for copying, and then edit that field for each folder. After copying, use the ‘Edit metadata’ function to add additional metadata to each folder.
- See http://www.ncbi.nlm.nih.gov/biosample/docs/packages/ for help determining the appropriate BioSample type for your data.
- If you require BioSample templates for variants of MIMS, MIGS, or MIMARKS data, please make the request at support@cyverse.org
- Only submission package folders have metadata. Do not add metadata to the sequence files.
- Any changes to folder names, file names, or metadata require that you save a new metadata file before submission.
- For the top-level, or BioProject, folder in the submission package, select the NCBI BioProject Creation WGS BioProject Metadata template, and enter metadata (metadata template tutorial):

For each BioSample folder in the submission package, select the NCBI BioSample - Plant WGS BioSample Metadata template, and enter metadata (metadata template tutorial):

For each Library folder in the submission package, select the NCBI WGS Library Metadata template and enter metadata (metadata template tutorial). To facilitate metadata entry, enter all shared metadata for a single Library folder and then copy it to all other Library folders. After copying, you can add unique metadata to each Library folder.
Do not add metadata to the sequence files.

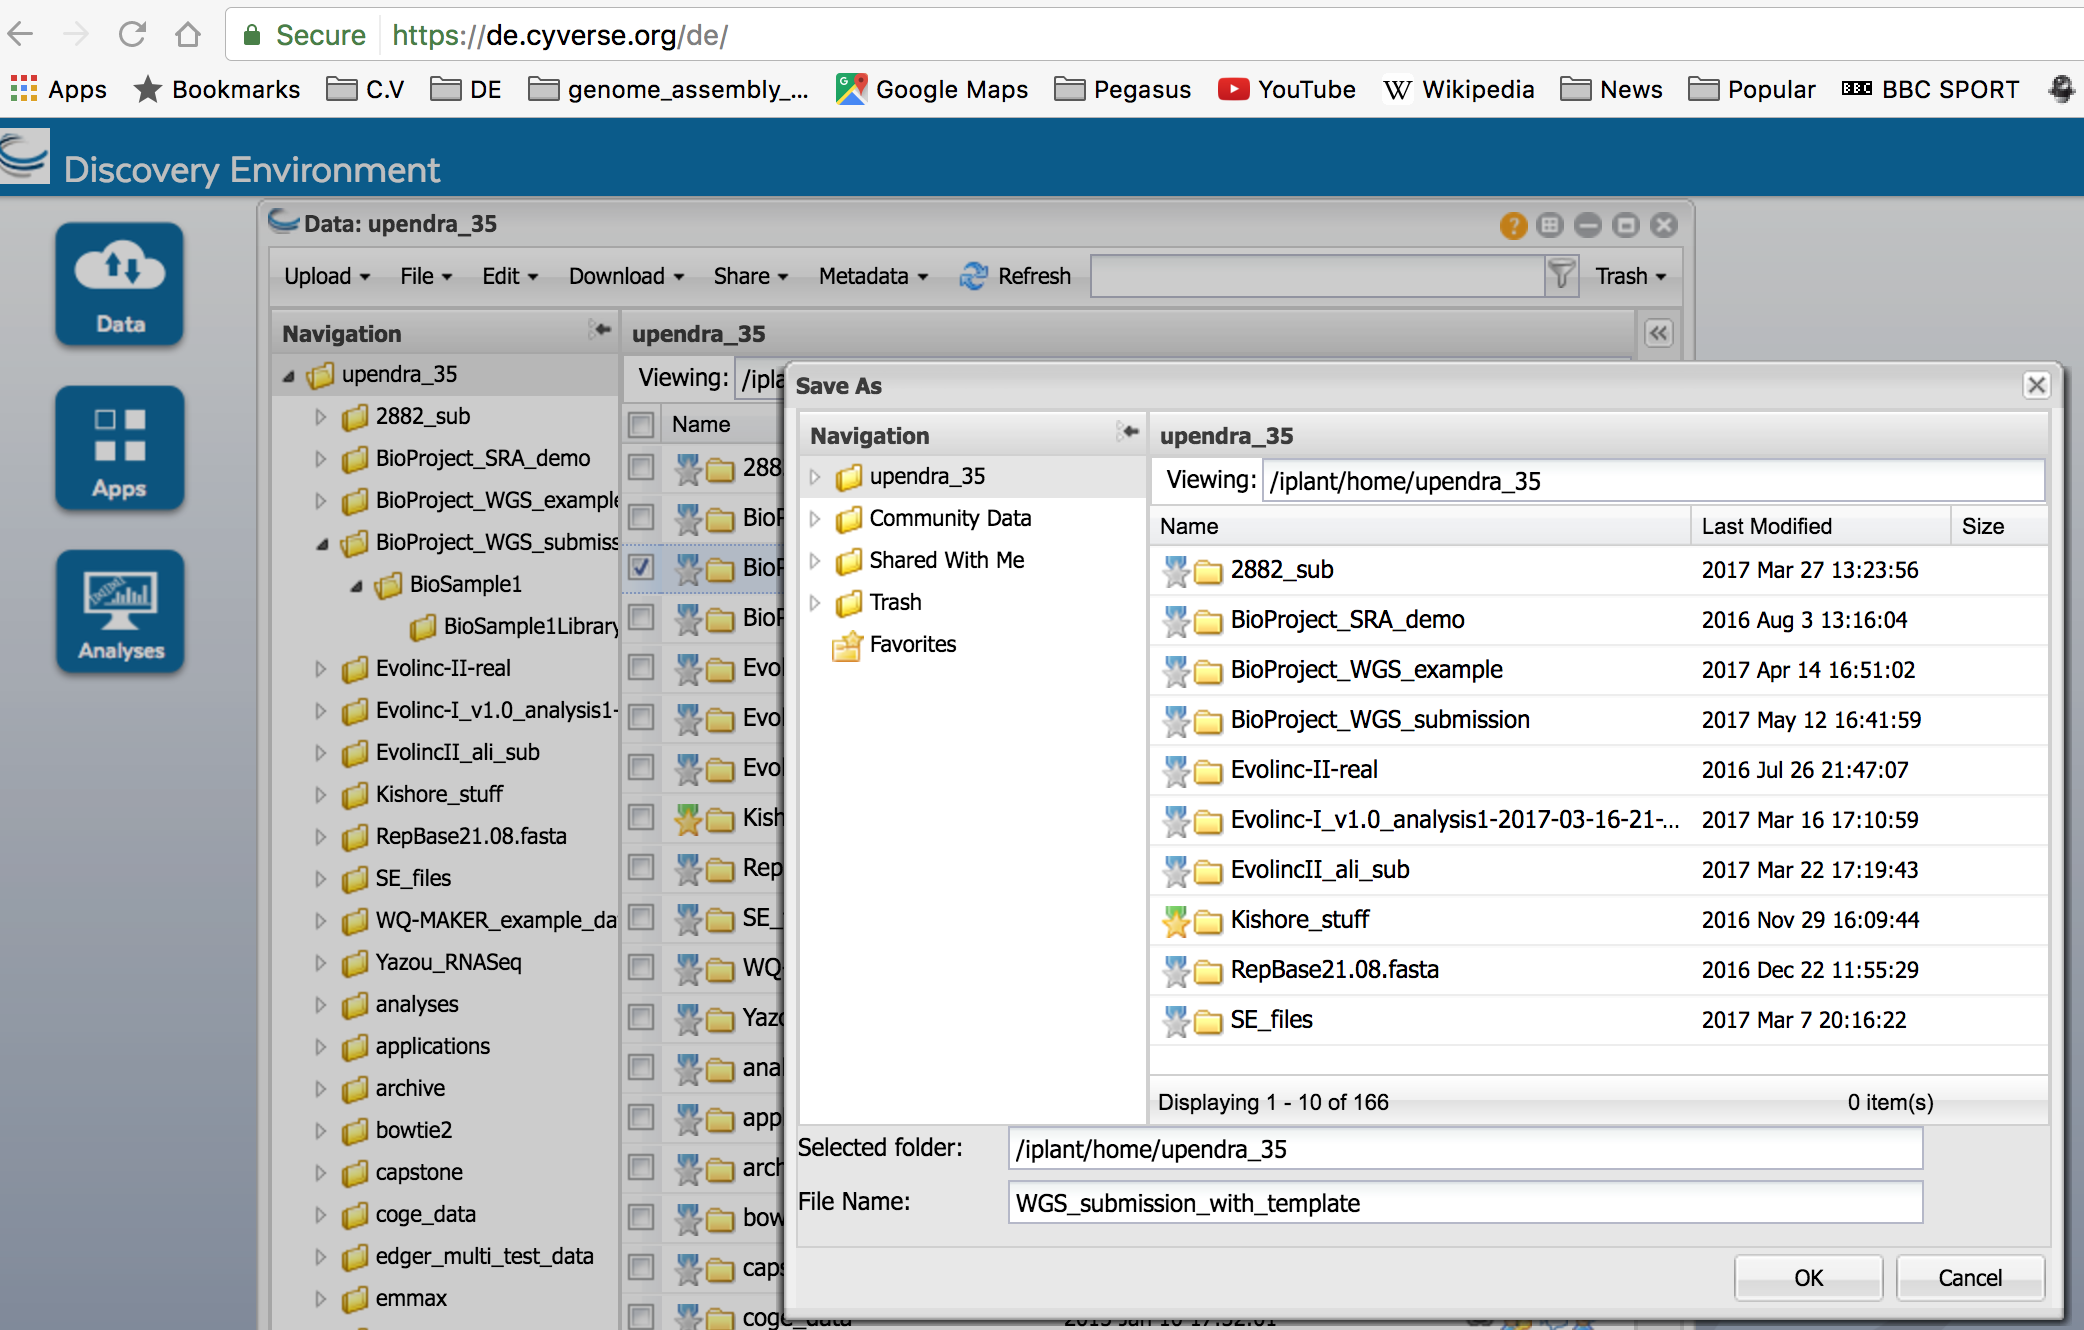
After the metadata has been entered, select the top-level BioProject folder in the submission package and use the ‘Save metadata’ function to save a BioProject metadata file for the submission package. This file will serve as input into the WGS submission app in the next step (Step 3):


Once the metadata file has been saved, select the NCBI WGS Submit app to validate the submission package and metadata file. Note: Do not put metadata file in BioProject folder.
- During validation, the app will attempt to create a submission.xml metadata file for use by the WGS system based on the metadata entered into the templates, but will not transfer any files to the WGS. At submission, the app will both create the submission.xml metadata file, and transfer it and sequence files to the WGS.
- If the submission.xml file is created in the DE Analysis output folder and there are no errors, the package has successfully passed validation.
- Input: The BioProject folder (top level of the submission package), BioProject metadata file and checked box of "Validate metadata file only"
Output:
Logs folder with information on job execution.
A folder named with your CyVerse username and the top-level BioProject folder ID that contains the submission.xml (metadata file formatted for ingestion by the WGS).


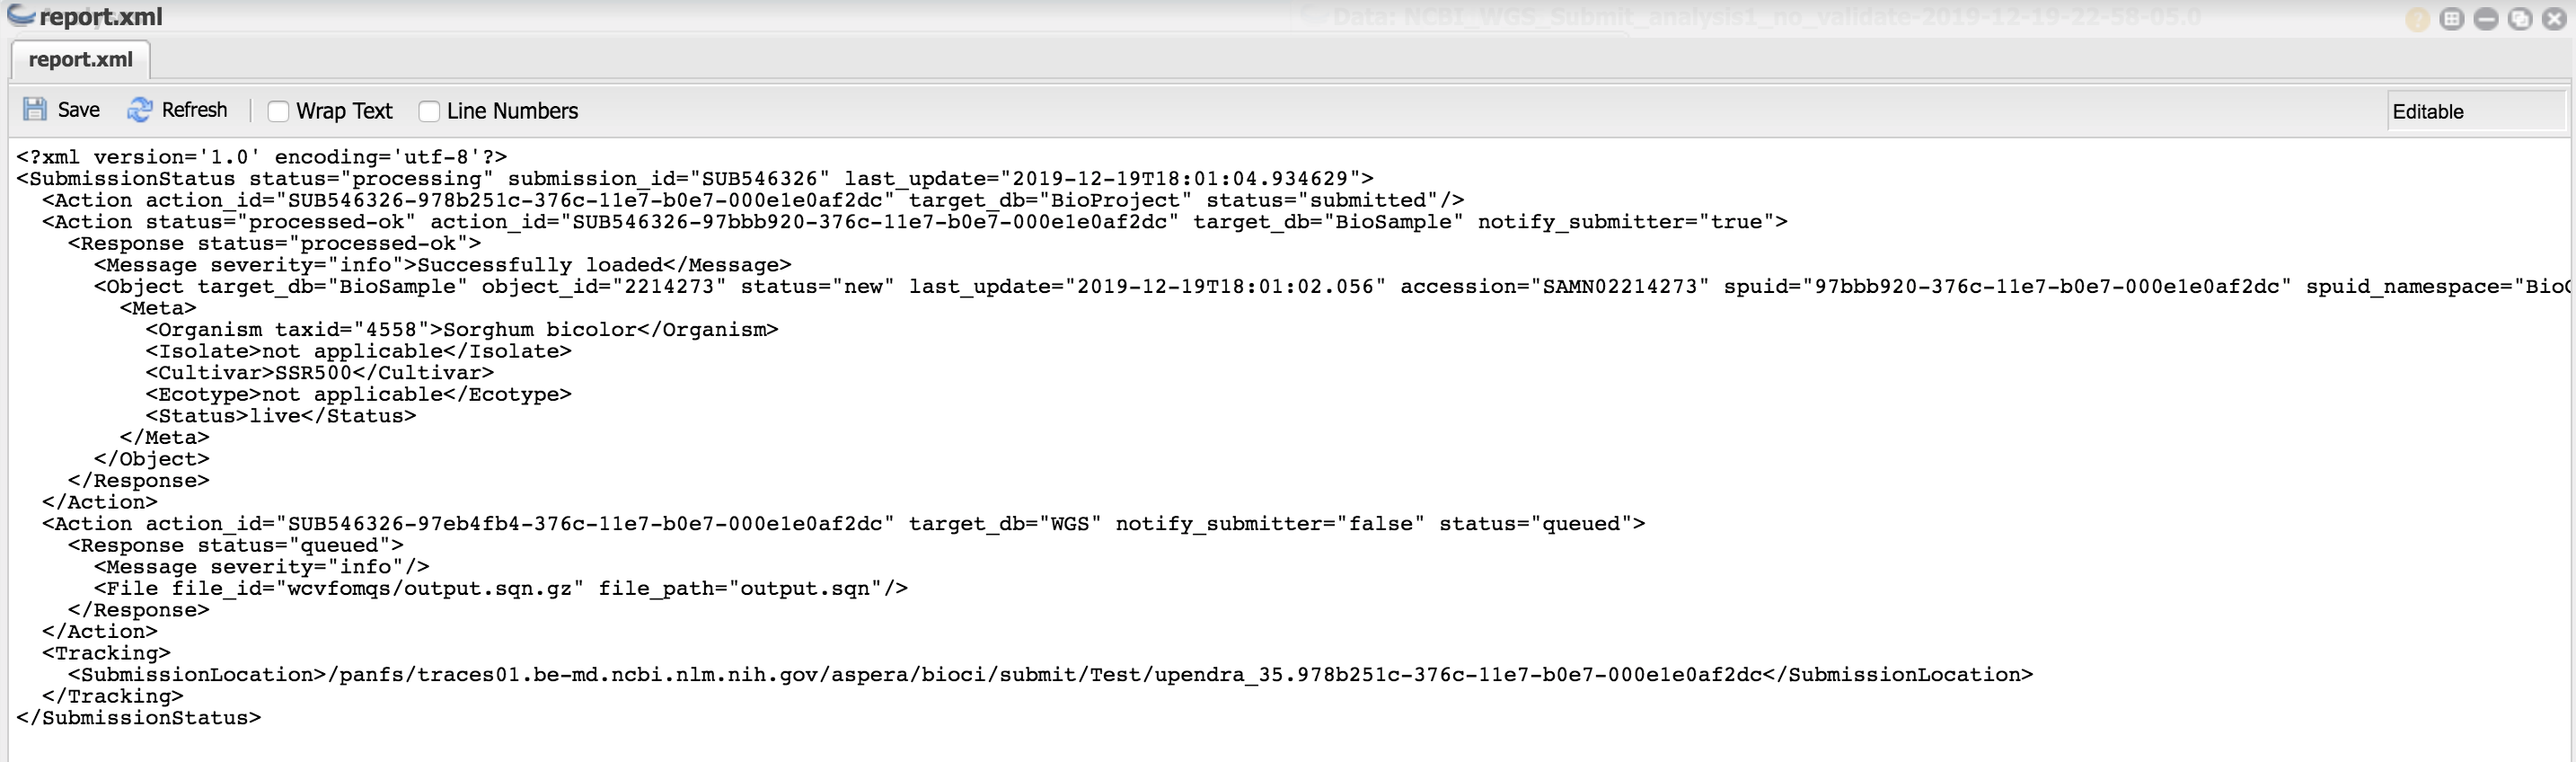
- After successful completion of the run, you should see a file - "report.xml" and within that file, you should see the message "processed-ok" indicating the metadata is correct
Step 3: Create the submission template
- WGS submission requires the creation of a submission template (.sbt).
- Open the "meta2tbl" app in the DE and provide the path to the Bioproject metadata file created in Step 2.
- Input: The Bioproject metadata file created in Step 2 and the "meta2tbl" app in DE.
- Output: The template file named "template.sbt"

- After successful completion of the run, "template.sbt" file is created from the metadata template file.
Step 4: Convert fastq to sqn
Tbl2asn is a command-line program that automates the creation of sequence records for submission to GenBank. It uses many of the same functions as Sequin but is driven generally by data files. Tbl2asn generates .sqn files using the template generated from Step 3 for WGS submission. Depending on whether or not your genome is gapped or ungapped, you can choose between the tbl2asn-gapped-25.3 or tbl2asn-ungapped-25.3 DE apps.
- Input: The minimum requirements to generate a Sequ.in (sqn) file using tbl2asn are:
- Template (sbt) file (generated in Step 3)
One or more .fsa (fasta) files. Nucleotide sequences in fasta file must conform to the following standards:
There should be no gaps represented, although Ns can be used to represent sequence ambiguities.
There should be no more than 10,000 sequences per file. It is often convenient to group sequences by molecule type (e.g., chromosome) or sequence status (e.g., unplaced or unlocalized).
Typically, files will end with an .fsa extension (e.g., chr1.fsa, chr2.fsa, unknown.fsa) .
- Larger submissions need to be split into multiple files.
- Submit only contigs >199nt.
- Remove any Ns from the beginning or end of each sequence.
Optional files: These correspond to and have the same basenames as the .fsa files:
Annotation files, if appropriate. The .tbl files have a 5-column tab-delimited table of feature locations and qualifiers.
- The .qvl files that provide Phrap/Consed quality scores.
- Output: tbl2asn will generate an .sqn for every .fsa file in the directory, plus any of the corresponding optional files that may be present. The other files must have the same filename prefix as their corresponding .fsa (for example, helicase.fsa and helicase.tbl).


Check the output of the Validation and Discrepancy Report and fix problems:
- Check the errorsummary.val file for the number, severity and type of errors that are present in the .val files. All Errors and Rejects need to be fixed. Contact genomes@ncbi.nlm.nih.gov with any questions about the validation output.
- Check the file named 'discrep' for the results of the discrepancy report.
- Categories prefaced with FATAL are always unacceptable and must be fixed.
- Some of the categories are informational.
- Reports that are not flagged as fatal need to be evaluated to determine if they represent annotation artifacts that need to be corrected or if they are acceptable due to the biology of the genome.
- See the discrepancy report examples and explanations for guidance. Write to genomes@ncbi.nlm.nih.gov and send the discrep file with questions about this report.
- Make any necessary fixes to the input .fsa and/or .tbl files and run tbl2asn again. You also can make the necessary fixes directly to the .sqn file by opening it in Sequin and editing the features there.
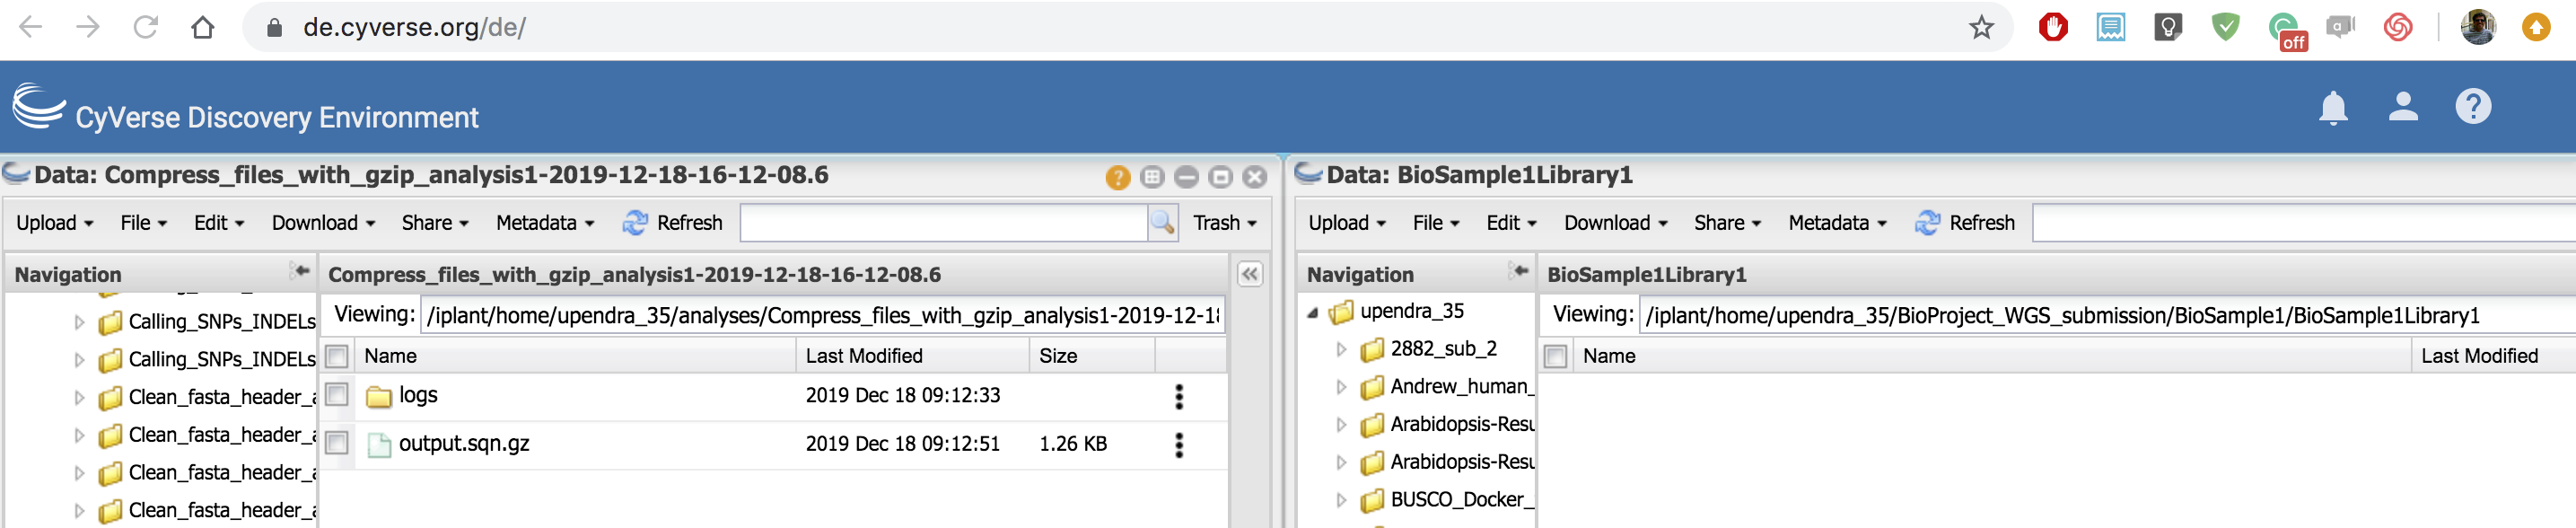
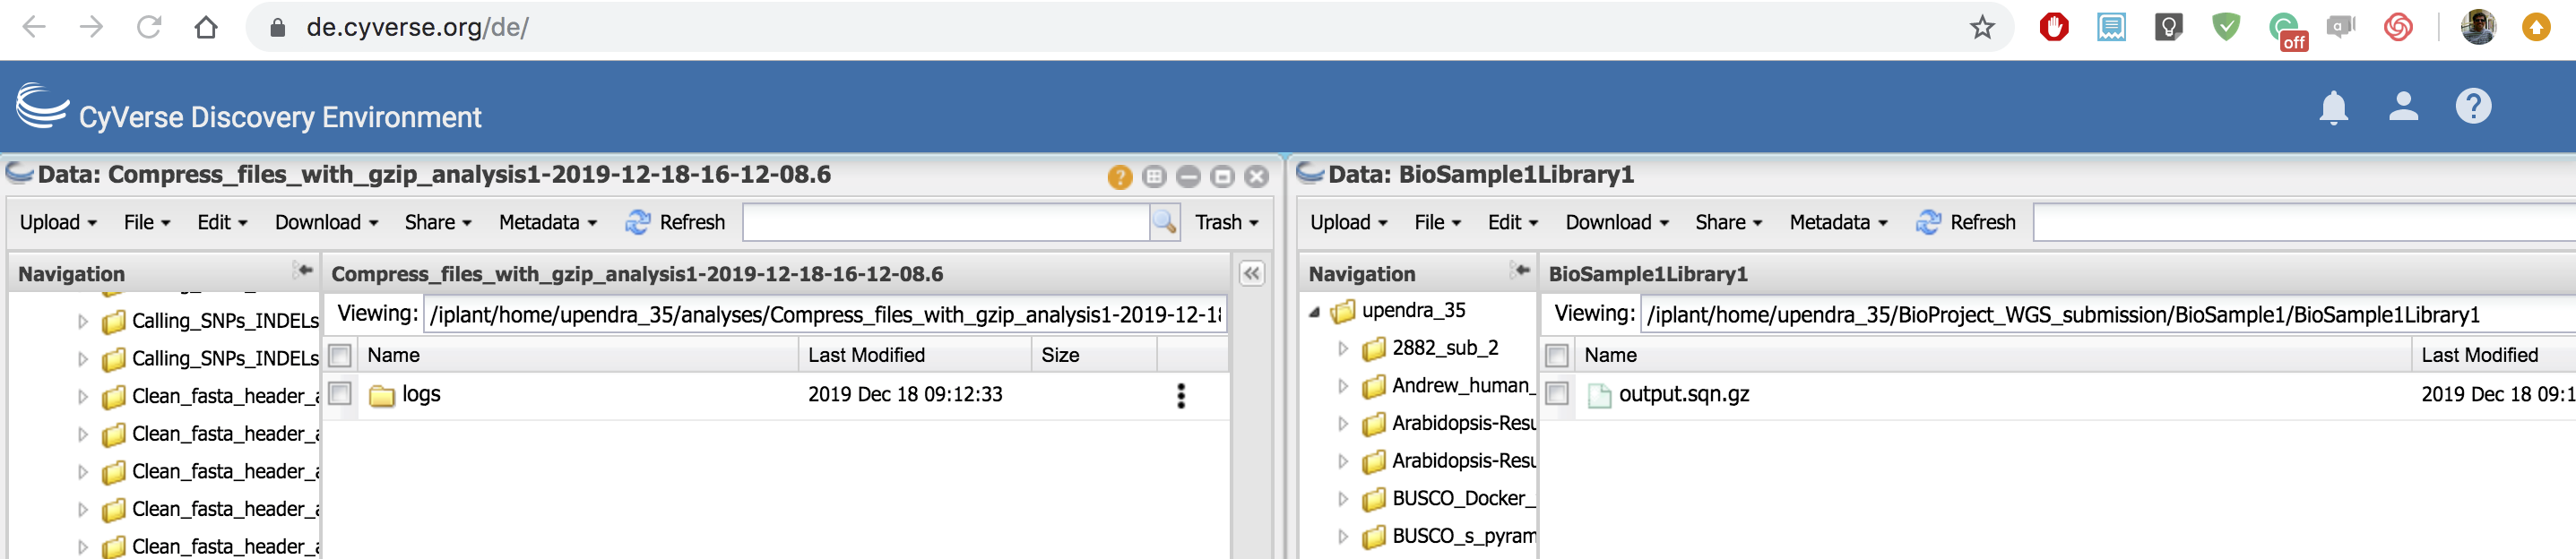
Step 5: Compress the sqn file
NCBI requires that you compress your sqn file before submitting it to WGS. So we will use "Compress files with gzip" app to compress the output.sqn file to output.sqn.gz file
- Input: output.sqn generated from Step 4
- Output: output.sqn.gz

Step 5: Move sequence files to the submission package and save a BioProject metadata file
- Input: Sequence files (sqn) to be submitted to the WGS
- Output: Bioproject metadata file
Caveats and suggestions
In the DE, you can open two windows and then move the sqn files from one window to another window. If the files are big, it slightly takes more time to move them around.
If you already have sqn files, then you can upload files to the DE. See this guide to choose the most appropriate upload method. CyVerse Upload Tutorial - CyberDuck is highly recommended for your uploads.
- After the sqn files have been moved, select the top-level BioProject folder in the submission package and use the ‘Save metadata’ function to save a BioProject metadata file for the submission package. Do not use the same name as in Step 2.
- This file will serve as input into the WGS submission app in the next step (Step 6).
Step 6: Submit the submission package to the WGS
- Run the same app, without selecting the 'Validate metadata file only' option to submit.
Input: The BioProject folder (top-level of the submission package) and the BioProject metadata file (saved from the top-level of the submission package).
Output:
Logs folder with information on job execution that includes a ‘manifest.txt’. file with a log of the files transferred to the WGS.
Folder named with your CyVerse username and the top-level BioProject folder ID that contains the submission.xml (metadata file formatted for ingestion by the WGS) and a submit.ready file used to signal WGS systems that submission is complete and to process the submission package.

Caveats and suggestions
- The same app will be run twice: once for validation and once for submission.
- If you made any changes to the submission package contents, or to file/folder names or metadata since last saving the BioProject metadata file, remember to resave the BioProject metadata file before running an app.
- The information buttons in the Apps
(to the left of the app name in the Apps list) provide important details.
- The Validation stage is optional but may highly reduce errors detected by the WGS. This is suggested for first-time users.
- For either validation or submission, if the app fails and no submission.xml file is created, there are one or more errors in the submission package. See the Analysis log files (especially condor-stderr-0) for information to assist with error correction.
- Successful validation within the DE does not guarantee that the WGS will not detect additional errors.
- No actual analyses are performed. Metadata will be aggregated into the submission.xml file (Validation and Submission stages) and the package will be transferred to the WGS (Submission Stage).
After you submitted, the submission package will be validated by the WGS system and email notifications will be sent by the WGS to the contact email added in the BioProject metadata to confirm successful submission, or to communicate submission errors.
What happens at WGS? CyVerse systems connect to WGS systems and create the submission folder on the WGS side. Files are transferred and a submit.ready file is sent to the WGS to signal that the submission package is complete and they can begin processing. The WGS system validates the submission package and generates a report.xml file containing any errors detected. The WGS system sends notification email(s) to the contact email provided in the BioProject metadata template, and to the CyVerse team to notify of either a successful or failed submission. The first email will be titled "Submission ownership transfer". Follow the instructions in that email to transfer ownership of the submission to the NCBI user included in the package metadata. After ownership transfer, you can view the submission progress at https://submit.ncbi.nlm.nih.gov/subs/. You may need to log in with the NCBI credentials for the account you used in the submission metadata. After you receive further notification from the WGS, i f there are errors, you can retrieve the submission report.xml file from WGS servers with the "NCBI_Report_Download" App in the DE, make corrections, and resubmit (see below).
Caveats and suggestions
WGS processing may take 72 hours (or longer) depending on the load on their systems. If you do not receive any notifications after a week, please email us at support@cyverse.org
Step 7: Download the report
If error correction and resubmission are needed, the WGS-generated error report can be retrieved with the "NCBI_Report_Download" App. Use this report to correct the errors and resubmit. Corrections to the submission package can be made within the DE by updating the submission package organization or metadata and resubmitting the beginning with Step 4.
- Input: CyVerse analysis output folder and submission package in Step 6.
- Output: Updated submission package.
- Caveats and suggestions
Remember to save a new metadata file from the top level of the submission package before resubmitting. It is best practice to name this file differently from the previous metadata file.
- During error correction, only make changes to WGS-detected errors. All other changes will be ignored by the WGS during resubmission. If additional changes are required, they can be made using the NCBI website after successful submission.
If no report.xml is retrieved after running this app, this does not necessarily mean your submission failed. The WGS system may not have generated it yet. Make sure to wait for notification from the WGS that the submission has been received and processed.
- To retrieve the submission report, select the “NCBI_Report_Download” app, and as input, select the CyVerse analysis output folder generated in Step 6. It will be named with your CyVerse username. The report will be fetched from the WGS and placed in a new analysis output folder generated by the retrieval app. To resubmit, make necessary changes to the submission package data and metadata, resave a BioProject metadata file from the top-level folder of the submission package, and resubmit with the appropriate WGS submission app.

After successful processing, you should get an email something like this

If you encounter any issues during WGS submission, please send an email to support@cyverse.org.