Requesting an Image of an Instance
- kkennedy
- Former user (Deleted)
- sgregory
- Former user (Deleted)
About images
An image is a type of template for a virtual machine.
You can launch an instance and install the software and files you want to use, then request an image of the instance using the Request Imaging form within Atmosphere, as outlined below. This allows you to retain a complete copy of all of the changes and updates you made to the instance so you can reuse it again later, much like a template. It also is a way to share your image with other CyVerse users and define who can view and launch the image, from public sharing (visible to and launchable by all users) to private sharing (only you can view and launch the image), and with specific users (visible to and launchable to specified users).
Images save resources, since you can relaunch an instance of your image at any time instead of having to keep the instance running when you don't need to use it. After submitting your form, the Atmosphere support staff completes the request. Future versions of Atmosphere will allow users to initiate the VM imaging process automatically.
For a basic introduction to instances and images, see Using Instances.
Requesting an image of your instance
You can request an image (a type of template for a virtual machine) of a running instance. This saves a complete copy of all changes and updates you made to the instance since you launched it so you can reuse it at any time. It also saves resources by launching the instance only when you need it. You also can see the list of all image requests you have made.
You can add a script before requesting the image that executes after an instance using the image is launched and active.
Once the image is created, you can edit the name and description of the image, the end-date (date the image is hidden from the public), and add or remove image tags.
Prerequisites
- Read the Important notes section to the right. All non-CyVerse-purchased licensed software, or non-cloud-compatible software must be removed before requesting the image.
- Detach all attached volumes from the instance.
Opening the request form
Click Projects on the menu bar and open the project with the instance to use for the new image.
Click the instance name. The instance must be in Active status.
- In the Actions list on the right, click Image.
Step 1 – Image Info
Name and description
Enter up to 30 characters for the new image name.
Enter the description as you want it to appear when viewed in Atmosphere. The description should include key words that concisely describe the tools installed, the purpose of the tools (e.g., This image performs X analysis), and the initial intent of the machine image (e.g. designed for XYZ workshop).
Image tags
- Either:
- Select a tag to add to your image (you can also add and remove tags to the image after it has been created):
- Click in the Search by tag name field and begin entering the first letter or two of a tag.
- Click the tag to use and then click Add.
- Repeat for each tag to add to the image.
- Add a new tag to the tags list:
- Click New tag.
- Enter the tag name and description.
- Click Create tag.
- Repeat for each new tag to add to the image.
- Click Done editing.
- Click Next.
Step 2 – Version Info
- In New Version Name, enter the new (unique) name or number of the tool to distinguish this tool from others with a similar name.
- In Change Log, enter a brief description of the changes you made to this version of the tool.
- Click Next.
Step 3 – Privacy (image visibility)
- Select the visibility level for the image from the dropdown list:
- Public: Makes the image visible to and launchable by all users.
- Private: Allows only you to view and launch the image.
- Specific Users: Makes the image visible to and launchable only by specified users.
- Either:
- If done, click Submit.
- Click Advanced Options to set additional options.
Steps 4, 5, and 6 – Advanced Options (optional)
- Click Advanced Options to set advanced options such as excluding directories from the image, adding deployment scripts that execute when the image is launched or the status changes, or requiring the user to verify understanding of any license restrictions.
Step 4: Files to exclude
To exclude files from the image, list each file to exclude on a separate line and then click Next. (To not exclude any files, just click Next.)
Step 5: Deployment Scripts and Software Licenses
Deployment scripts
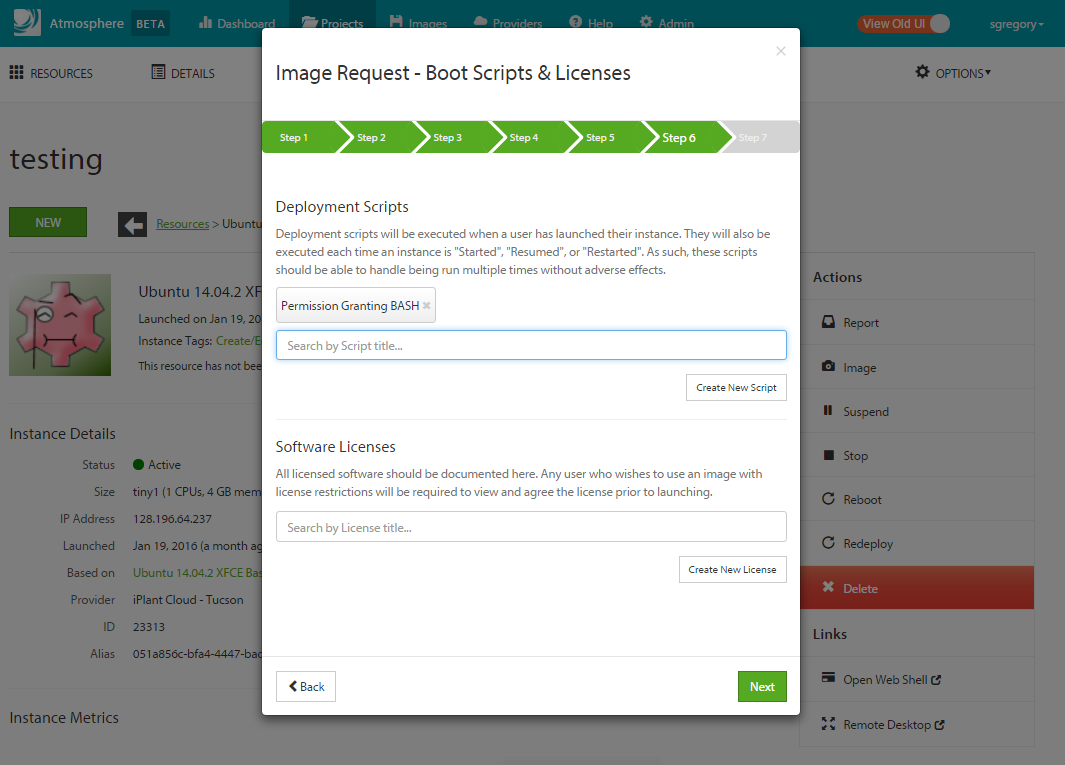
- To add a deployment script, click in the search field and search for the title of the script. If done, click Next.
- To create a new deployment script:
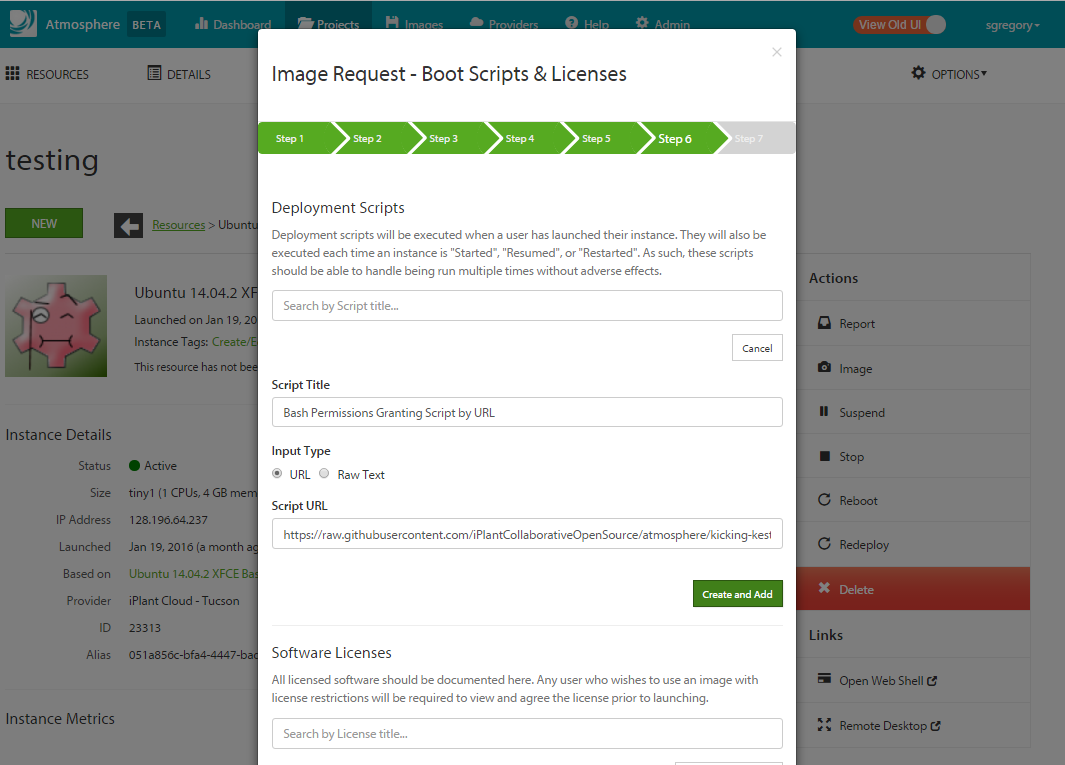
- Click Create New Script, enter a title for the script, and then either click URL and enter the URL to the script, or click Full Text and enter the deployment script.
- When done, click Create and Add, and then click Next.
- To add a script that executes after the image is launched, see the section below.
Software Licenses
- To list licensed software used in the image and require users to agree to the license agreement before launching, click in the search field and search for the license title.
- To create a new license:
- Click Create New License, enter a title for the license, and then either click URL and enter the URL to the license, or click Full Text and enter the full license text.
- When done, click Create and Add, and then click Next. (Just click Next to continue to the next screen without adding a new script.
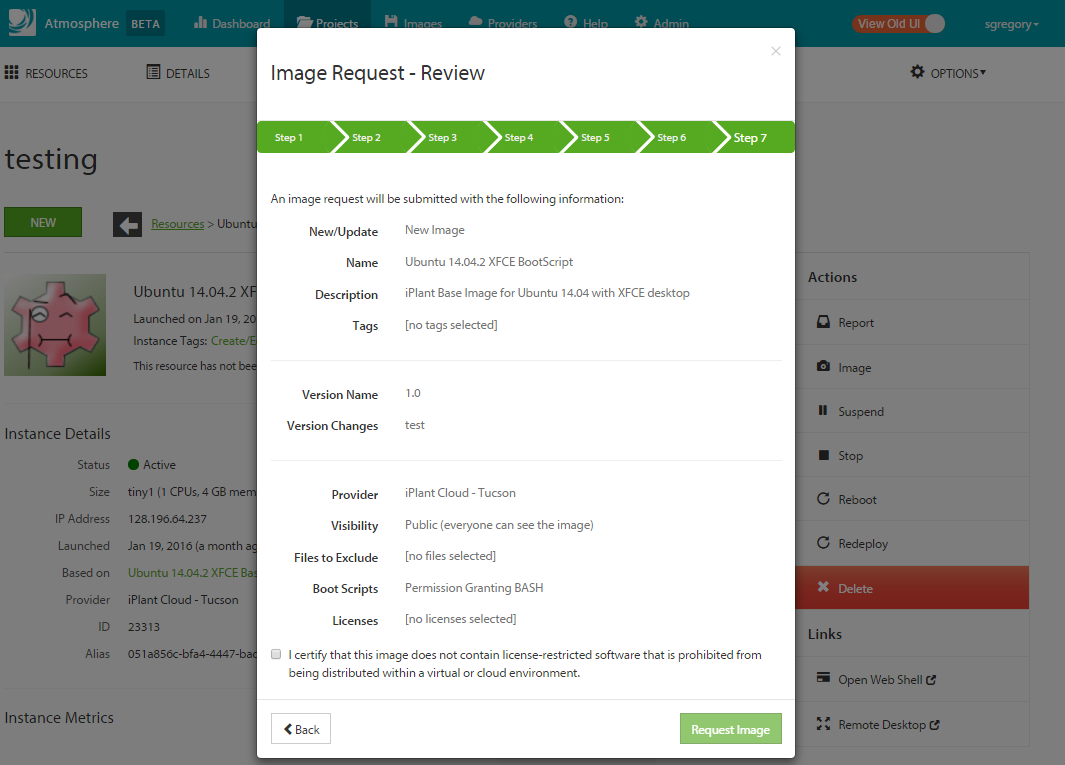
Step 6: Review and submit request
- In the Step6 screen, verify that the options you selected are correct (if not, click Back to change them).
- Click the checkbox certifying that the license does not contain any license-restricted software. Read the Important notes to the right.
- Click Request Image.
You will receive an email from Support when the image is completed. Please email questions to Support at support@cyverse.org.
Viewing your list of images
To view your lists of images and image requests, click Images on the top menu bar.
Click My Images tab at the top of the screen.
Viewing your list of image requests
To view the list and status of your image requests, either:
- Click Images on the top menu bar and then click My Image Requests at the top of the screen.
–or– - Click your username at the top right of the screen, click My requests, and then click Imaging Requests.
Important notes before requesting an image
Before submitting your request for an image of your instance, you must remove the following software from the instance:
Licensed software that was not purchased by CyVerse.
Software in which the licensing otherwise prevents the use within a cloud or virtualized environment.
DELETED DIRECTORIES:
The following directories are deleted from the resulting image as part of the imaging process. (They are not deleted from the instance from which the image is created, which remains intact throughout the entire process.)
- /home/
- /mnt/
- /tmp/
- /root/
- /scratch/
NOT COPIED as part of the image:
- Volumes
- iRODS FUSE mounts
OVERWRITTEN: The following system files are typically overwritten by CyVerse for security or operational reasons:
- /etc/fstab
- /etc/fstaf
- /etc/group
- /etc/host.allow
- /etc/host.conf
- /etc/host.deny
- /etc/hosts
- /etc/ldap.conf
- /etc/passwd
- /etc/resolve.conf
- /etc/shadow
- /etc/sshd/
- /etc/sysconfig/iptables
- /root/
- /var/log
NOTE: The permissions of the operating system are NOT affected by the imaging process.
If you install software as username:iplant-everyone and you intend to provide that software to other users who launch your image, you will need to include a Boot Script that will change the permissions of the directory.
Adding scripts that execute after an instance using the image is launched and active
Adding a script to the instance
An image creator can add a script to an instance before it is converted to an image that will execute after the instance using the image is launched and active.
- Before requesting the image, create or symlink the script into the /etc/atmo/post-scripts.d directory.
Enter a 'shebang' (bash in the following example) at the beginning of your script:
#!/bin/bash
- Mark both the folder and the script with read and write (
+rxor0755) permissions. After an instance using the image is launched and active, the script will be executed.
Adding a boot script
Additionally, you can add boot scripts through the UI. This method allows you to change those scripts over time. The script can be provided by URL or providing the 'Raw Text' including a shebang line, as referenced above.
Click Advanced Options at the Privacy step, before reviewing the image.
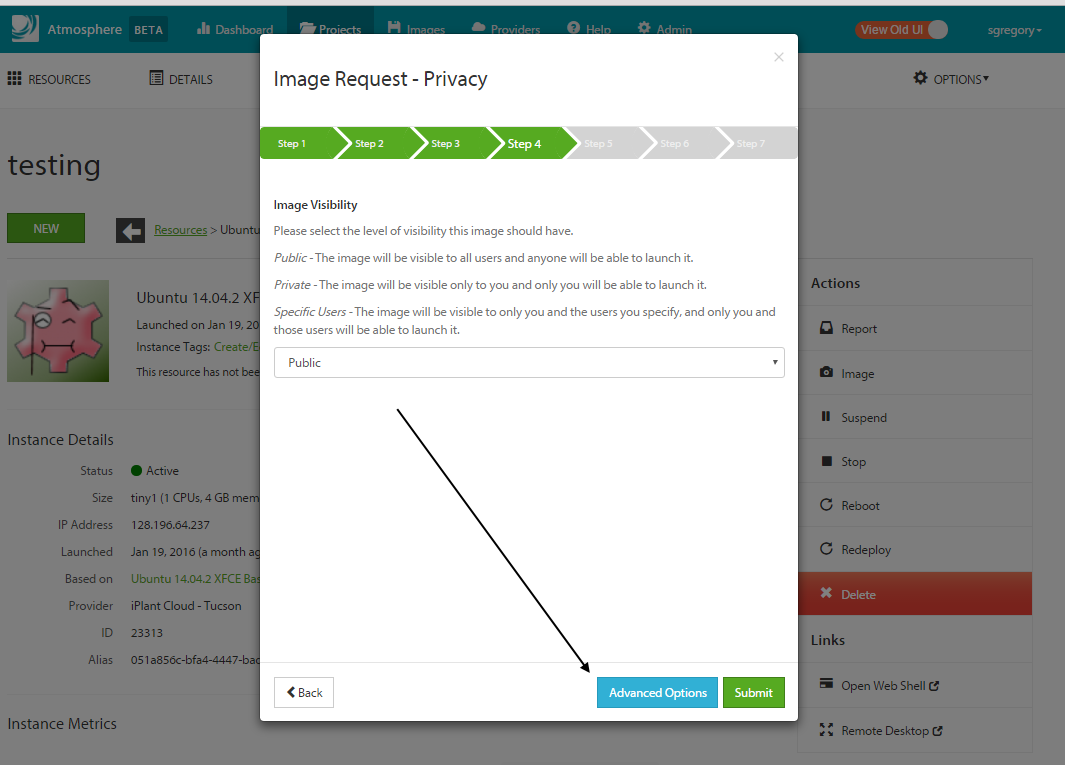
Skip the Exclude Files step and move to the Deployment Scripts section.
Select the Create New Script option to create a script.
Use the search bar to select a previously created script. Scripts are saved per user, and can be reused across images and instances.
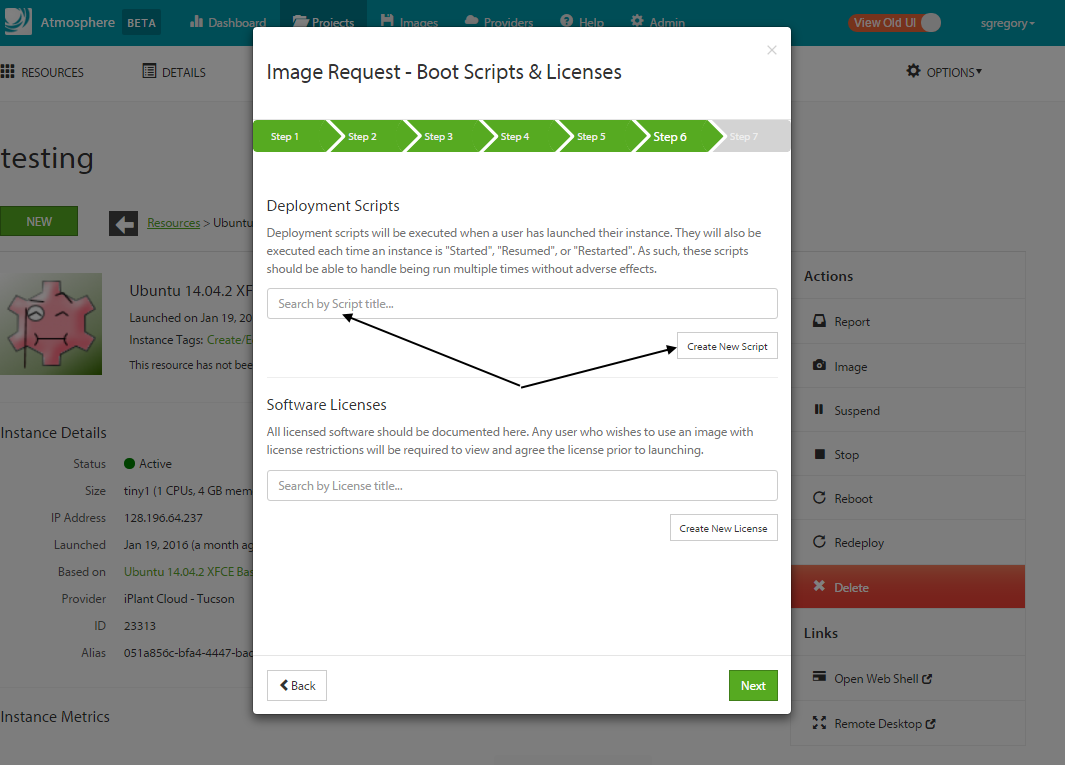
Create a new script using one of the two methods:
New script by URL. (URLs must start with http[s]://)
New script by Text field. (It is expected that your script will include a shebang line.)
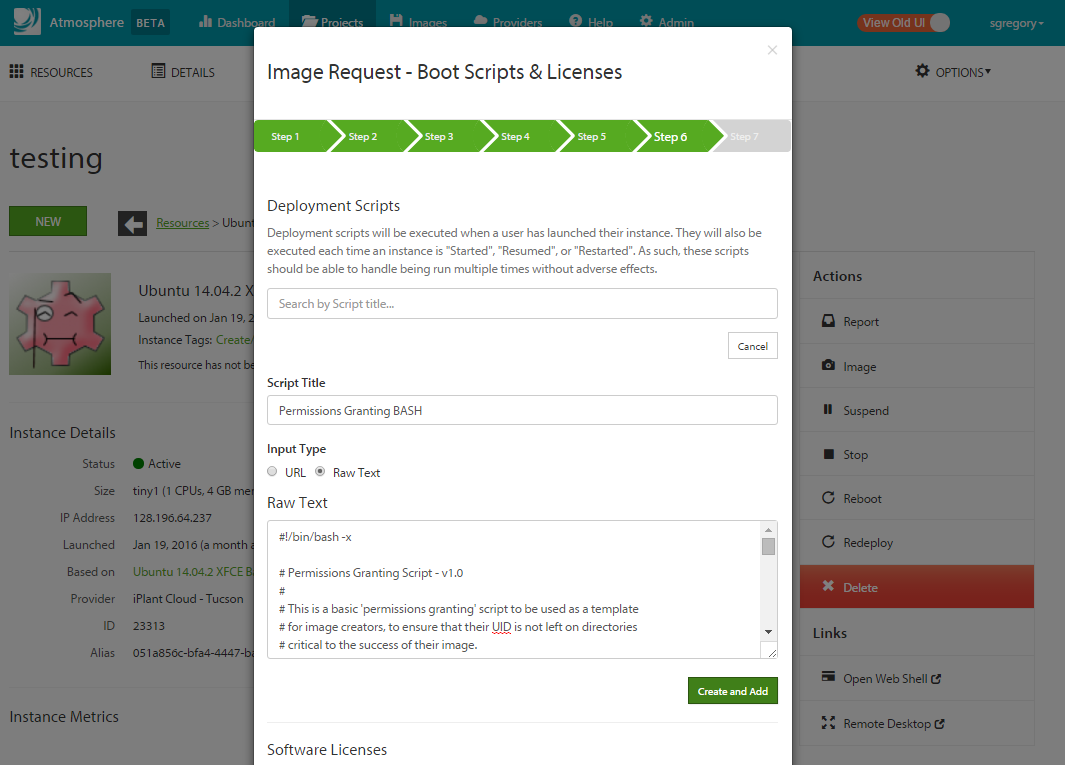
6. After creating the new script you should see it listed in the Deployments Scripts section.
You should also see it in the final review step.
Example boot script for changing permissions to the ATMO_USER
ATMO_USER is a variable that Atmosphere injects at runtime to ensure that the correct username will be known by a script. This is a requirement for chown-ing permissions of a directory to the user who launched an instance, rather than the user who created the image.
The code below provides a boilerplate example of how one would apply permissions to ATMO_USER for the /opt directory. After changing the directory to match your use case, you should be able to copy this script into the Text field.
Requesting that your image be deleted
Currently, the only way to remove (also known as deleted or archived) an image you requested is to email CyVerse Support. You will receive an email when your image has been archived.
Tips
Here are some tips to help ensure a viable importable image:
- Operating system: Base the image on CentOS 7 and later, or Ubuntu 14.04 and later.
- File system: Ext3, Ext4, or XFS.
- Image format: RAW or QCOW2.
- Software: Image must contain no licensed software that would prohibit use within a cloud or virtualized environment.
When your image is ready, the preferred way is to provide the image to staff through the Data Store.