Creating and Editing Workflows (Pipelines)
Sometimes referred to as a pipeline, a workflow is a sequentially-run set of analyses that allows a user to sequence two or more apps to run analyses in a specific order, so that the output file from the previously completed app is used as the input file for the next app's analysis.
The process of creating an automated workflow is similar (but not identical) to creating a new app interface. The process of editing or deleting a workflow is the same as editing or deleting an app.
Creating a workflow
Requirements and limitations
Please be aware of the following requirements and limitations when creating workflows:
- Currently only linear workflows may be created. At least one input for each app must come from an output of a previous app.
- Apps to be used must have inputs and outputs that have been described in metadata by the tool's integrator. Currently, only a limited number of apps can be used in automated workflows. You can, however, create an automated workflow by copying an app, creating an output field, and publishing it to your personal workspace to be used in an automated workflow.
- If an app prepends part of the input filename onto the output filename, currently the app cannot be included in a workflow. The app must allow you to create a defined output filename so that the output filename does not contain any portion of the input filename.
Before you begin, you may want to view the YouTube view, Build an Automated Workflow. You may also want to look at the sample Genomics Workflows and the apps and processes used for them.
Step 1: Enter the name and description for the workflow
- Unable to render {include} The included page could not be found.
Click Workflow and then click Create New. The Automate Workflow window opens.
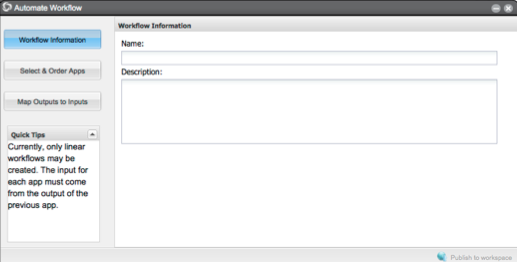
- Enter the name and description for the workflow.
Step 2: Select the apps for the workflow
Click Select & Order Apps on the left and then click Add.

- Select the first app to add to your workflow and click Add.
Repeat for each app to add to the workflow.
Want them in a different order?
Don't worry about the order of the apps---you can reorder them in the next step.
The status bar shows the number of apps added and the name of the last app in the workflow:

When finished, click Close. The selected apps in the workflow are displayed.

- Click Save.
Step 3: Reorder the apps
- To change the order of the apps in the workflow:
- If necessary, click Select & Order Apps.
- In the right section, click the app to move.
- Click either Move Up or Move down until the app is in the correct position for your workflow.
- Repeat until all apps are in the correct order.
- Click Save.
- To remove an app in the workflow, select the app and click Remove.
Step 4: Map the outputs to the inputs
Click Map Outputs to Inputs on the left.

The Step 1 app displays the data file and output file fields.
The Step 2 app displays the data file that will be outputted from the Step 1 app.- If you added more than two apps to the workflow, click the drop-down list in the data file field and select the output file to use from one of the previous steps in the workflow.
- Repeat for each subsequent app in the workflow.
- When done, click Save.
Step 5: Test the workflow
- Find the workflow in your Apps under development list and test it.
When you are satisfied with the workflow, you can share it.
Once a workflow has been submitted, it cannot be edited or copied.
Editing and deleting a workflow
The process of editing a workflow is the same as editing an app.
- To edit your workflow, see Creating, Copying, and Editing DE Apps.
- To delete your workflow, see Deleting an App or Workflow.
On This Page:
Related Pages: